Pages

Saturday 30 March 2024

UTG Cinderella Bridge Card | Stamping Bella

Hi all, Today  I'm shing a Bridge Card featuring Uptown Girl Cinderella and a sentiment from the Hello Spring sentiment set. 

 The card measures 6" x 6" when folded flat and fits easily into an envelope for mailing. 


Supplies:
White card
Designer paper ( used: Echo Park, My Little Girl)
Scoring board and bone folder
Rainbow and Clouds Dies
Stitched Rectangle Dies
Spica glitter pens

How to:
Cut white card:
(1x) 8" x 6" - card base
(1x) 3-7/8" x 5-7/8" - centre panel
(4x) 7/8" x 5-7/8" - sides
(1x) 2" x 6" - bridge
(1x) 1-7/8" x 5-7/8" - bridge
(1x) 3.5" x 1.25" - sentiment

Cut paper:
(1x) 3.75" x 5.75" - centre panel
(4x) 0.75" x 5.75" - sides
(1x) 1.75" x 5.75" - bridge

Stamp Uptown Girl Cinderella onto white blending card and colour using your preferred medium. 


Add some sparkle to her dress and gloves using Spica glitter pens.


Fussy cut around the outline and set aside to work on the card. 


Score the 8" x 6" piece of card on the long side at 1", 2", 6" and 7"


Valley fold the inside score lines and mountain fold the outer score lines. 


Adhere all the paper pieces to their corresponding card pieces


Adhere all the panels to the card base. 


Apply glue to one end of the bridge


Line it up with the edge of the card base, approx. 1" from the bottom. 


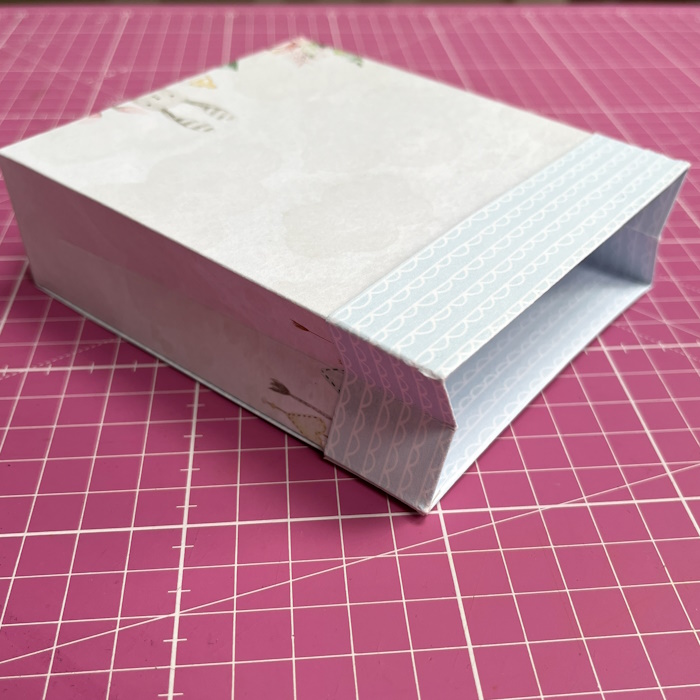
Fold in the side panels and adhere the  other end of the bridge to the opposite side, again lining it up with the edge of the card base. 


Apply glue or foam tape/dots to the image only where it meets the card base. Also leave enough of the dress to slide the end of the sentiment underneath before adhering it down. 


Stamp the sentiment onto the white card strip then cut out using the rectangle die. Slide the end under the image. 


Add some die cut clouds and a rainbow for a 3D effect.


For more new release inspiration check out the Stamping Bella blog and Stamping Bella Sisterhood page over on Facebook, where you can add your own Stamping Bella creations.


Where you can find me
   

Thursday 15 February 2024

Sprouted Baby One Sheet Gift Bag | Stamping Bella

Hi all, today I'm sharing how I made this One Sheet Gift Bag featuring the Sprouted Baby rubber stamp.  The bag measures 5" x 4.25" when completed but you can adjust the height/width to suit your needs. 


Supplies:
Card
Designer paper (used - P13, Baby Joy)
Scoring board and bone folder
Stitched circle dies
Stitched Pennant dies
Scalloped border die
Adhesives - wet glue, foam tape or dots. 

How to:
Cut double sided paper
(1x) 12" x 7.5"
(1x) 3.25" stitched circle

Cut card: 
(3x) Scalloped border dies
(1x) 3.5" Stitched circle 
(1x) 3.25" x 0.75" stitched pennant

Stamp Sprouted Baby onto white card. Colour using your preferred medium, then fussy cut around the outline. Set aside to work on the bag. 


Score the 12" x 7.5" piece of paper on the long side at 4.25", 5.75", 10" and 11.5". 


Turn to the short side and score at 1.5" and 6.5"


Turn back to the 12" side and score at 5" and 10.75" from the 1" score line down to the 5" mark. This helps pinch in the sides. 


With the front of the paper facing upwards, fold down the 1" score line, then with the 1" section folded down, fold and burning all the vertical score lines. Fold up the 1.5" bottom score line and burnish well. 


Open up the folds and, on the 0.5" side section, cut away the bottom 1.5" section. Make a tab from the top 1" section as shown below. Taper the edges of the tab and longer 0.5" section. Cut up on the vertical score lines of the 1.5" bottom section, tapering the 1.5" sections to make tabs. 


Fold down the 1" section again. Apply adhesive to the long 0.5" section, and keeping the tab up off the long section, apply adhesive to that also. 


Fold over the opposite end and adhere to the 0.5" section. Then lift the 1" section at the top and fold the small tab in underneath. 


Turn the bag upside down and apply adhesive to the side sections and one of the larger sections. Fold in the side sections, then fold down the section with no glue over them. 


Finally, fold in the larger section with the glue. Square up the bottom before the glue dries. 


Take a bone folder and burnish the bottom inside of the bag to secure well. 


Adhere the card and paper circles together and apply foam tape to the back. 


Adhere the scalloped border around the top outside of the bag, then adhere the circles to the bag front. 


Again using foam tape, adhere Sprouted Baby to the circles panel. 


Stamp the sentiment onto the card pennant. 


Adhere the sentiment beneath the image using foam tape or dots. 


Insert a small gift and/or gift card into the bag. 


For more new release inspiration check out the Stamping Bella blog and Stamping Bella Sisterhood page over on Facebook, where you can add your own Stamping Bella creations.

Where you can find me