Pages

Thursday, 30 June 2022

Saloon Door Reveal Card | Stamping Bella

Hi all! Today I'm sharing  how I made this Saloon Door Reveal Card featuring Tropical Squidgies from Stamping Bella. This is a fun interactive card that is really quite easy to make. The whole card was made using just card and P13 papers. All of the beach elements are cut out from the papers as is the beach/water scene behind the image. 


Supplies: 
Navy card & white card. 
Designer paper (used: P13, Beyond the Sea)
Scoring board & bone folder
Pencil, ruler & eraser
Embellishments/die cuts

How to:
First stamp the larger Tropical Squidgies image onto white colouring card/paper. Colour the image then fussy cut around the outline. Set aside for now. 


*For the purpose of the tutorial, I used white card to show the mechanism steps. I also made them in navy for the card.  

Cut navy card:
Card base: 8.25" x 5.75", scored at 4-1/8" on the 8.25" side. Fold and crease well. 
Mechanism (x2) : 1-1/8" x 4-7/8"
Doors (x2): 2-1/8" x 3.25"

Cut white card:
Card front: 3-7/8" x 5.5"
Doors (x4): 2" x 3-1/8" 
Inside panel: 4" x 4-1/8"

Cut paper:
Card front: 3.75" x 5-3/8"
Inside panel: 4" x 5-5/8"
Doors (x4): 1-7/8"" x 3" 
Pillars (x2): 5/8" x 4"
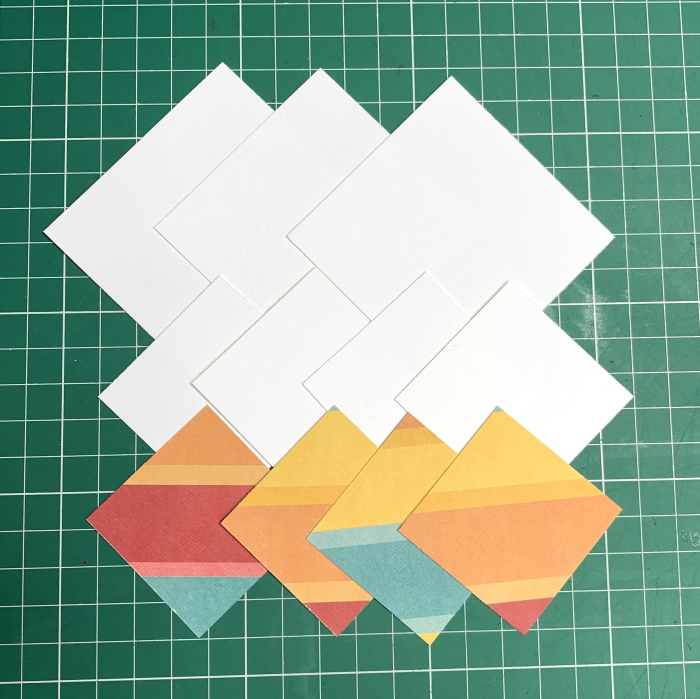
Triangles: 5/8" x 5/8" & 7/8" x 7/8" squares, cut diagonally. 

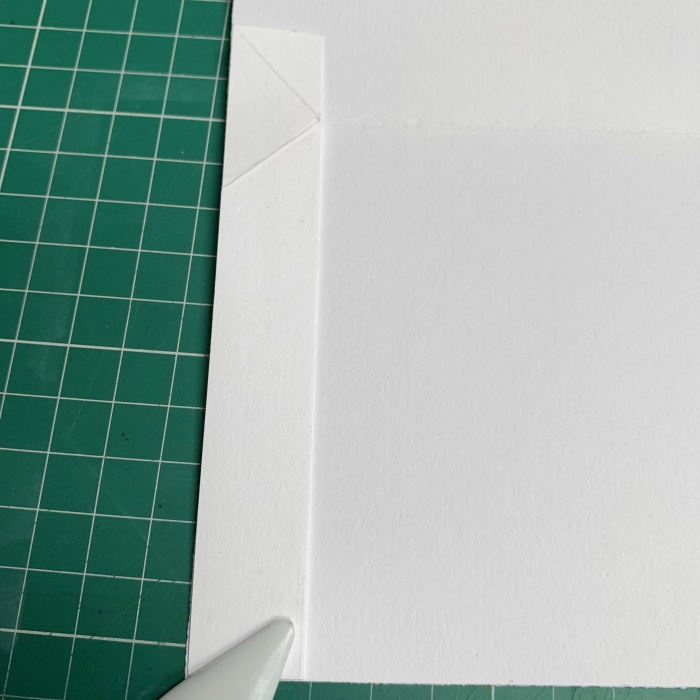
Score both of the mechanism pieces at 0.75" on the 1-1/8" side
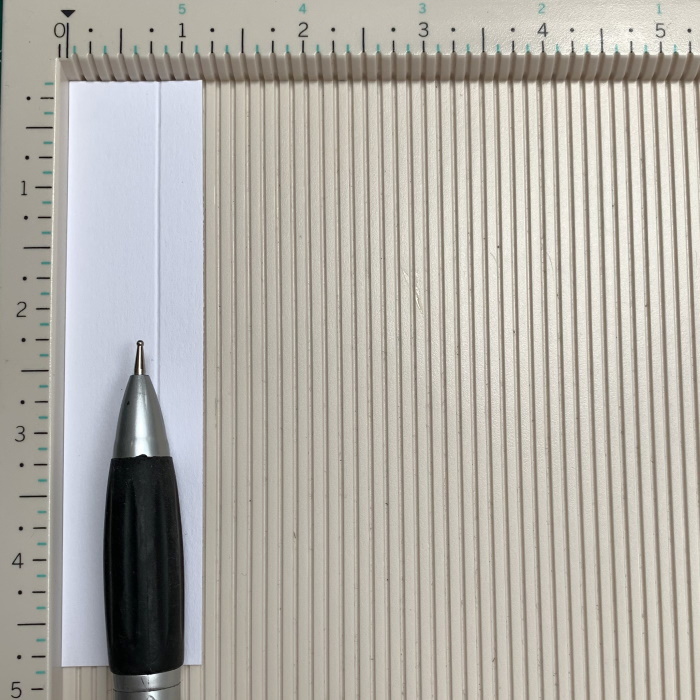

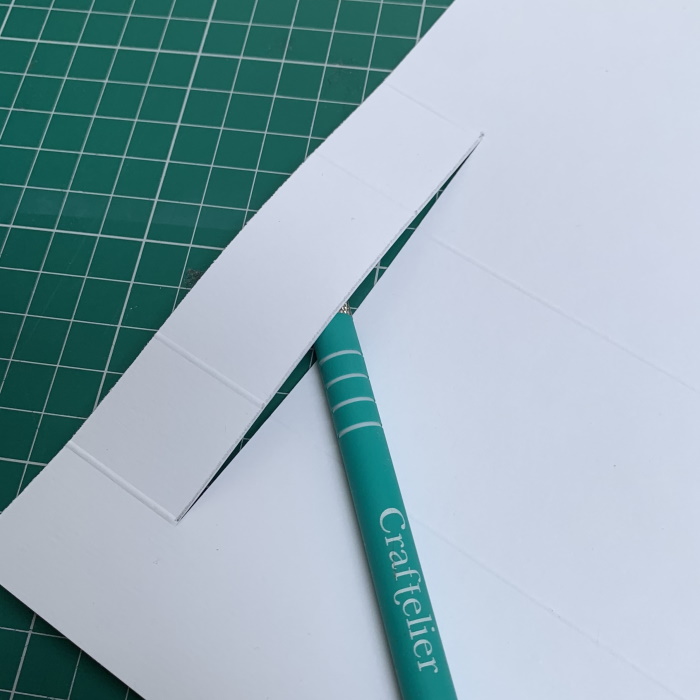
Measure down 0.75" on the score line and mark with a pencil. Measure down 1.5" on the wide side and mark with a pencil. Draw a line from one pencil mark to the other. 


Using the ruler, draw a line from the top corner of the wide side, through the 0.75" pencil mark, to the edge of the narrow side. 


Cut on the inside of the score line, down to the 0.75" mark and then diagonally along the pencil line. 


Score the remaining pencil lines, fold, and crease well. 


Repeat the steps for the second mechanism. 


Apply glue to the narrow side of the mechanism. 


Adhere to the inside of the card, ensuring that when the wide side is folder outwards it is flush with edge, or very slightly inside the edge. 


Repeat on the opposite side, folding the top tabs outwards as shown. 


With the tabs folded outwards, apply glue to the outer triangle only - on each side of the card.  


Fold over the top  of the card and burnish well. 


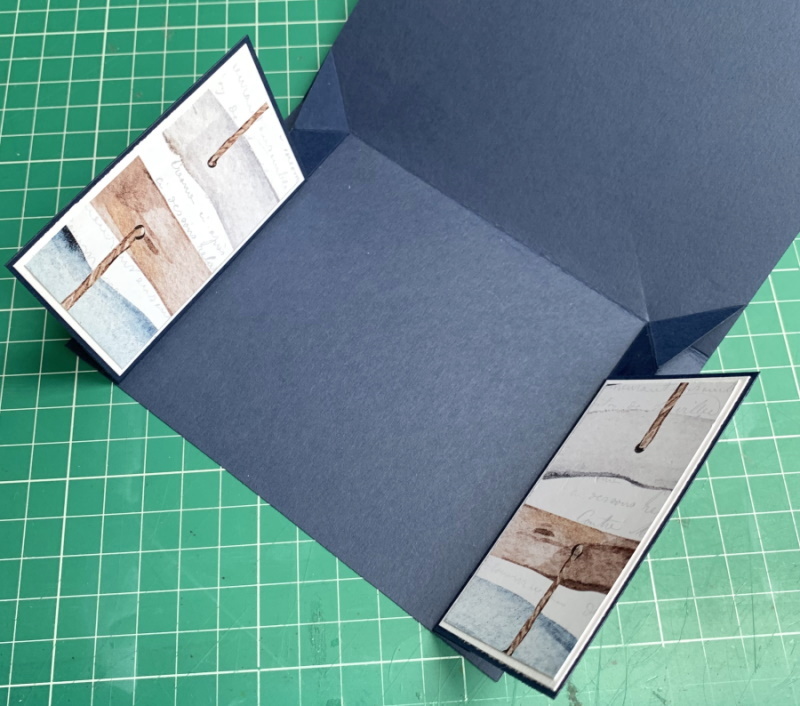
When the card is opened the mechanisms should look like this. 


For the doors, adhere the white card layer and paper layer to one side of the navy card. 
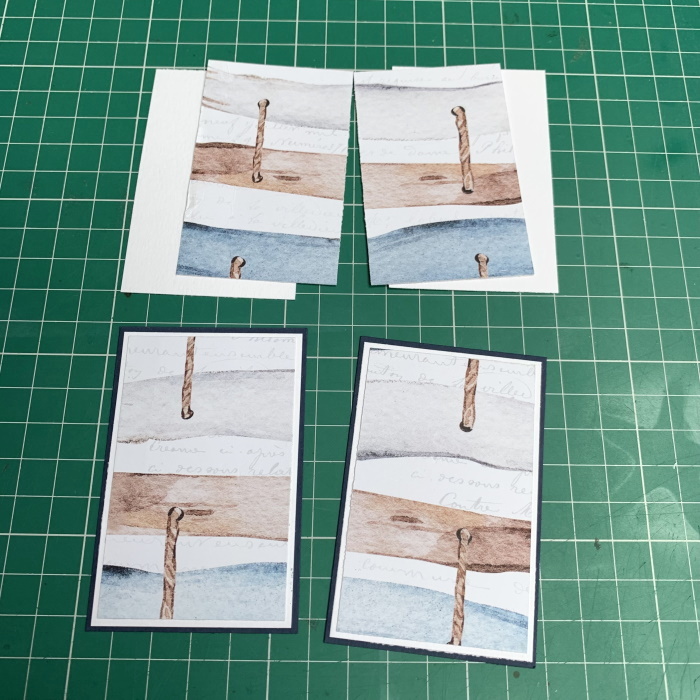

Open out the card base fully. Apply adhesive to the long section of the door mechanism, keeping about 0.25" from the bottom of the score line. 


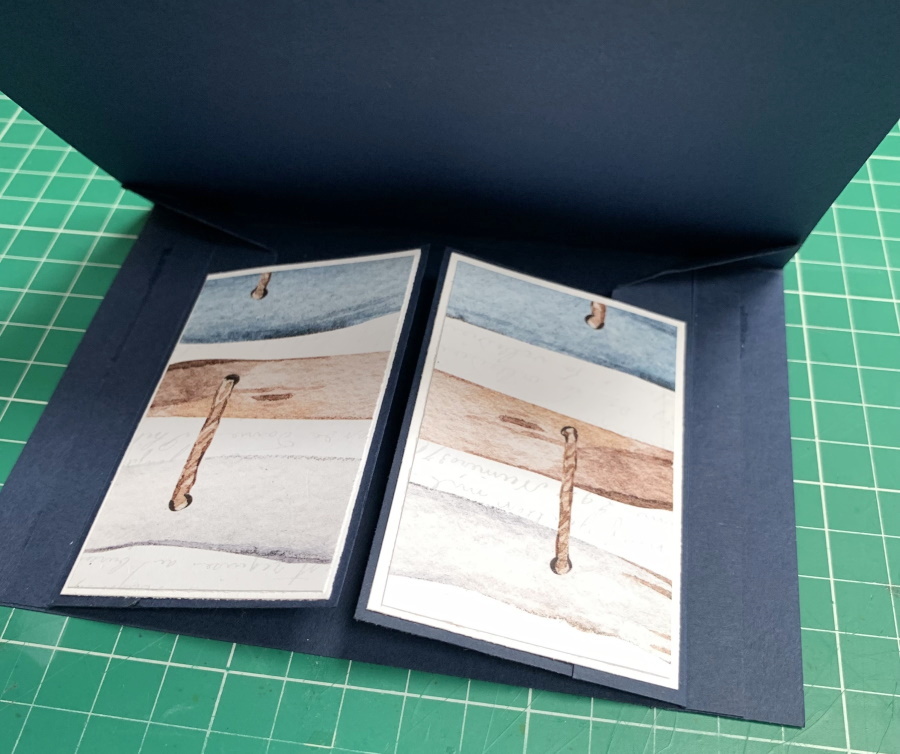
Adhere the doors to the mechanism. These are the inside of the doors. 


Repeat on the opposite side. 


Adhere the white card and paper layers to the other side of the door. 


Stamp the sentiment onto the 4" x 4-1/8" piece of white card and adhere between the doors. 


Cut the two small squares diagonally and adhere the triangles to the top sections of the mechanism. 

Take the 4" x 5-5/8" piece of paper and lay it on the inside top of the card. Use a stylus or bone folder to crease a line beside the mechanism. Repeat on the opposite side. Cut approx 1/8" inside the crease lines and then adhere the panel down. 


Adhere the pillars each side of the doors, covering the narrow side of the door mechanism.


Adhere the white card and paper panels to the card front. Cut some beach elements from the papers, or use beach themed embellishments/die cuts, and decorate the card front. Finally, adhere the Tropical Squidgies using foam tape/dots.


For more inspiration check out the Stamping Bella Sisterhood page over on Facebook, where you can add your own Stamping Bella creations.

Where you can find me


Thursday, 16 June 2022

Double Display Card | Stamping Bella

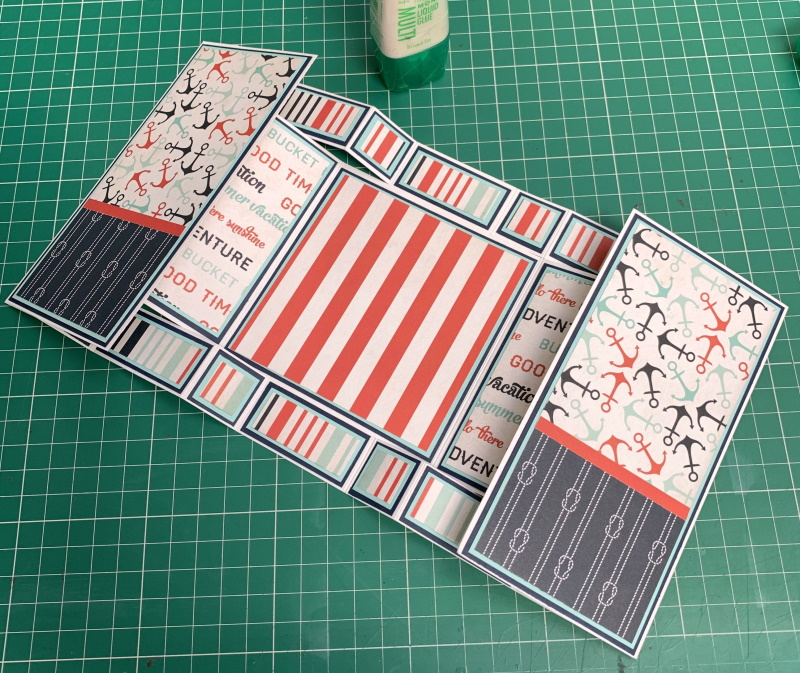
Hi All!! I'm back today with a step by step on how to make this altered version of a Double Display Card featuring Edna Loves the Ocean. This card design is stunning on display and it folds up to a 4" x 6" for easy mailing. It can be adapted for any occasion. 


Supplies:
Card
Nautical themed designer paper (used - Echo Park: Ahoy There)
Scoring board, bone folder, pencil, ruler, eraser
Stitched Circle and Stitched Rectangle Dies
Selection of die cuts for embellishing. 

How to:
Stamp Edna Loves the Ocean onto white card. Colour using your preferred medium, and fussy cut around the outline. Set aside to work on the card. 


For the card base, cut one piece of card measuring 6" x 12". On the long side, score at 2", 4", 8", and 10"


Again on the long side, score down from the top to the 1" mark at 1", 5", 7", and 11". Also score up 1"  from the bottom at 1", 5", 7", and 11".


Turn the card to the back and draw a line from the end (at the 1" mark) of the 1" score line to the 5" score line, and from the 7" to the 11" score line. Repeat on the opposite side. 


Using craft knife, cut across the pencil lines.  


Gently folding the score lines  - mountain, valley, mountain, valley fold 1" sections. Mountain, valley fold the larger sections. Repeat on the opposite side. 


Cut two pieces of card measuring 3" x 6".


Apply adhesive to the end section as shown, and adhere the 3" x 6" piece of card to it. Repeat on the opposite end. 


For the layering panels: 
Front x2 - 
Navy card 2-7/8" x 5-7/8"
Turquoise card - 2.75" x 5.75"
Paper - 2-5/8" x 5-5/8"

Inside centre -
Navy card - 3-7/8" square
Turquoise card - 3.75" square
Paper - 3-5/8" square

Inside sides x2- 
Navy card - 3-7/8" x 1-7/8"
Turquoise card - 3.75" x 1.75"
Paper - 3-5/8" x 1-5/8"

Long top and bottom x4 - 
Navy card - 7/8" x 1-7/8"
Turquoise card - 0.75" x 1.75"
Paper - 5/8" x 1-5/8"

Small top and bottom - x8 - 
Navy card - 7/8" x 7/8"
Turquoise card - 0.75" x 0.75"
Paper - 5/8" x 5/8"


Once all the layers are adhered, cut a selection of nautical themed die cuts for embellishment. Stamp the sentiment onto white card and cut out using a stitched rectangle die. 


Cut one 3.5" stitched circle from navy card and one 3.5" stitched circle from paper. Adhere them together, then decorate before adhering Edna using foam tape/dots. Adhere the circle panel to the centre section of the card. 


Decorate the front. 


For more inspiration check out the Stamping Bella Sisterhood page over on Facebook, where you can add your own Stamping Bella creations.

Where you can find me


Thursday, 9 June 2022

Mini Oddball Superhero Double Diamond Fold Card

Hi everyone! Today I'm sharing how to make this Mini Oddball Superhero Double Diamond Fold Card. Such a cute little card and it fits into a standard A2 size envelope. 


Supplies:
Card
Designer Paper - Piatek Trzynastego: Happy Birthday
Scoring board and bone folder
Pencil and eraser
Adhesive and foam tape/dots

How to:
Stamp Mini Oddball Superhero onto white card and colour using your preferred medium. Fussy cut around the outline and set aside. 


To make the card base, cut a piece of card measuring 4" x 10". On the 4" side, score at 2". 


Turn 90 degrees and score on the long side at 2" and 8". 


Make a notch with your stylus, or pencil, at  4" and 6", top and bottom. 


Measure along the centre score line and mark with a pencil or stylus at 3" and 7" 


Score from the 4" and 6" marks to the 3" and 7" marks top and bottom, as shown. 


Fold and burnish the outer score lines. 


Carefully fold the diagonal lines. 


With the outer sections folded back, squeeze inwards to create the diamond fold. 


For the layers, cut card - 
(1x) 2.75" square
(2x) 2-5/8" squares
(4x) 1.75" squares  

Cut paper -
(1) 2.5" square
(4x) 1-5/8" squares  


Adhere a 2-5/8" square to either side of the largest square. Then adhere the paper to the front side. Adhere the small square paper pieces to the small square card pieces. 


Apply foam tape/dots to the lower half of the back of the largest square, on the diagonal.


Adhere to the centre section of the card base, lining up the points so that they are at the score line. 


Adhere the four smaller panels on the front and back of the outside of the card. 


Adhere Mini Oddball Superhero to the diamond using foam tape/dots.


Stamp the sentiment onto a piece of white card and then, using the back section of the diamond as a guide, cut out into a triangle a little smaller than the card layers. 


Decorate as desired. 


For more inspiration check out the Stamping Bella Sisterhood page over on Facebook, where you can add your own Stamping Bella creations.

Where you can find me