It's Thursday and that means I'm back with another Stamping Bella Tutorial Thursday post. Today I'm sharing how I made this Quadruple Slider Card which features one of our newest stamps Curvy Girl Namaste. On the sliders I have added some inspirational words from the Good Vibes and the Encouragement Sentiment stamp sets.


Supplies:
Card
Patterned papers
Scoring board and bone folder
Pencil and ruler
Plastic sandwich bag
Adhesive (double sided tape, foam tape, wet glue)
Embellishments
Twine
Card pieces:
(1x) 5.25" x 5.25" (card front)
(1x) 5-1/8" x 5-1/8" (card front)
(2x) 5" x 5" (internal panels)
(2x) 4.75" x 4.75" (mechanism)
(4x) 4.75" x 3.5" (sliders)
Patterned papers:
(1x) 5" x 5" (card front)
(4x) 4.5" x 3.25" (sliders)
How to:
Cut all the pieces of card and paper.

To make the mechanisms, measure and mark 0.5" from each end of all four sides on the 4.75" square card pieces.

Draw a line on one side from the top to bottom, repeat on the opposite side. Draw a line from the side 0.5" pencil marks in to the pencil lines, as shown.

Cut in on each of the side lines, to the vertical pencil line, and cut along the full lines to remove the sections shown here.

Repeat for both mechanism pieces.

On a sandwich bag, at least 9" in length, cut off the bottom seal. Measure across 3-5/8" and draw a line from top to bottom.

Cut along the 3-5/8" line, then open up and cut along the side seam to create two pieces measuring 3-5/8" wide x 9" long(minimum)

Carefully apply double sided tape the one end of the plastic bag strip, ensuring to keep it flat. Don't let any tape overhang the sides.

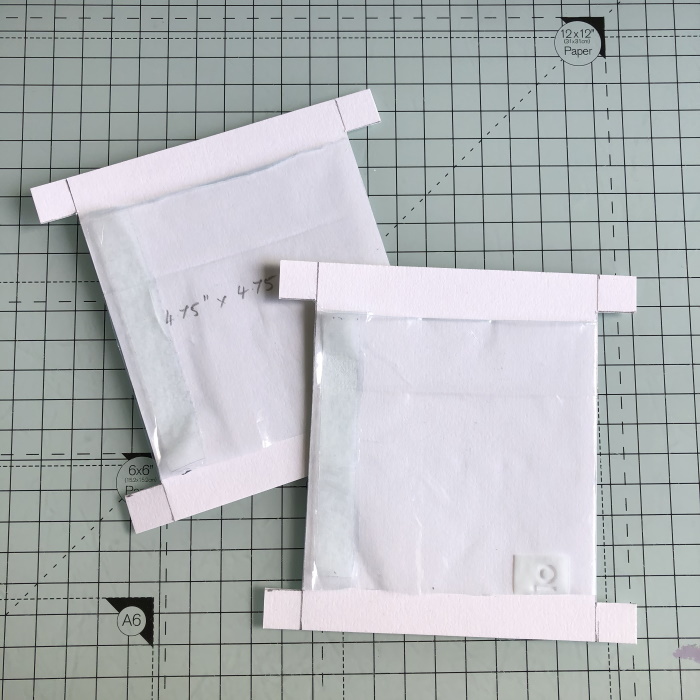
Lay the mechanism on top of the plastic bag strip with the 0.5" tabs either side of it as shown. Fold the end with the double sided tape in so that the tape is facing upwards.

Remove the tape backing and carefully fold over the other end of the plastic strip, adhering it to the double sided tape. Don't have it too tight, as it needs to move around the mechanism when opening and closing the slider. Cut away any excess.

Repeat for the other mechanism.
Round the corners on one end of the four slider pieces of card and paper, taking note that they go in opposite directions and be mindful of any patterns on your paper. Adhere the paper to the card.

Apply double sided tape to the end (not rounded) of one of the slider panels, on the back.

With the tape on the plastic bag pushed right over to the left hand side, adhere the slider panel to the left edge. Ensure the panel in completely on the bag each side, as it needs to move freely.

Take a second slider and apply double sided tape to the end, on the front

Flip the mechanism over and adhere the panel (front facing downwards) to the left edge.

When you turn it back over, this is how it should look.

Repeat these steps for the second mechanism.

For left and right sliders, take the mechanism and apply a strip of foam tape along the 0.5" section each side of the bag.

Take one of the 5" square internal panels and lay it on your work surface. Turn the slider mechanism over and adhere down onto the 5" square, centering it so that you are leaving a border of about 1/8" all around.

Turn it back over (it should look like this)

On the back of the second mechanism, which will be the top and bottom sliders, apply foam tape to the 0.5" section

Adhere it to the 5" square internal panel

Turn the whole thing over and apply more foam tape to the back of the bottom mechanism.

Adhere the second 5" square to the foam tape, using the other 5" square as a guide for placement.

Flip the sliders back over so they are facing up and apply foam tape to the front side strips, as shown.

Adhere the 5" square paper piece, the 5-1/8" square piece of card and the 5.25" square piece of card together to create the card front panel.

Eyeballing to centre, adhere the front panel down onto the foam tape.

This is a very thick card and won't fit in a standard envelope for mailing.
Set the card aside to work on Curvy Girl Namaste


Copics used:
Skin - E00, E11, E04,
Hair - E51, E53, E55, E35
Pants - RV93, RV95, RV99
Shirt - YR20, YR21, YR23

Fussy cut around Curvy Girl Namaste

Cut eight pull tabs, or four 1" circles.
(If you are using circles, cut them in half)

Using wet glue, adhere a pull tab (or half circle) to the end of the front and back of each slider.

Embellish the sliders as desired using sentiments from the Good Vibes Sentiment stamp set and the Encouragement Sentiment stamp set
Note: embellishments need to be as flat as possible so they don't interfere with the movement of the sliders.

For the front of the card, cut a scalloped circle approximately 4.75" in diameter and layer up some smaller circles. Prepare a selection of embellishments.

Decorate the card front. Adhere the circle panel down using foam tape and also adhere Curvy Girl Namaste using foam tape. Add some die cuts and enamel/glitter dots to embellish. Thread some white twine though the pull tabs (use a hole punch if you're using circles)
For more inspiration check out the Stamping Bella Sisterhood page over on Facebook, where you can add your own Stamping Bella creations.
My Social Media Sites


No comments:
Post a Comment