Happy Friday!! Today I am sharing my Stamping Bella Bellariffic Friday card.
Our theme this week is
Newest Release Showcase
My card features Mochi Donut Girl, and one of the new relatively Mochi Girl Collection. I love these girls. They are bigger in size and are great for practicing, and playing around with colours. I fussy cut around the top part of the image and adhered it down onto some patterned paper to add some colour behind her. The sentiment is from the Mochi Girl Sentiment Set, which is currently on sale for only $8.49!
Hi everyone! Today I am sharing my weekly tutorial for Stamping Bella. This week's tutorial was a labour of love and there were so many photos that I ended up making many quadtych just to keep the post from being too long.
This box can be slow the first time you make one, but once you get the hang of them they can be done in less than an hour (excluding colouring)
Scoring board, bone folder, ruler, and craft knife
2.75" and 2.5" Circle Dies
Adhesive and foam tape/dots
White ribbon (optional)
Embellishments
How to:
Cut one piece of white card measuring 6" x 9", and another piece measuring 6" x 11"
Score the 6" x 9" card on the long side at 3" and 6"
Score on the 6" side at 3"
Turn the card and score diagonally from the 3" scoreline on the short side to the first scoreline on the long side. Move out 1" and score again.
Repeat on the opposite end of the long side. as shown below.
Cut away the corners, on the outer scoreline.
Score again, on the short side, at 3.5" down to the intersecting scoreline.
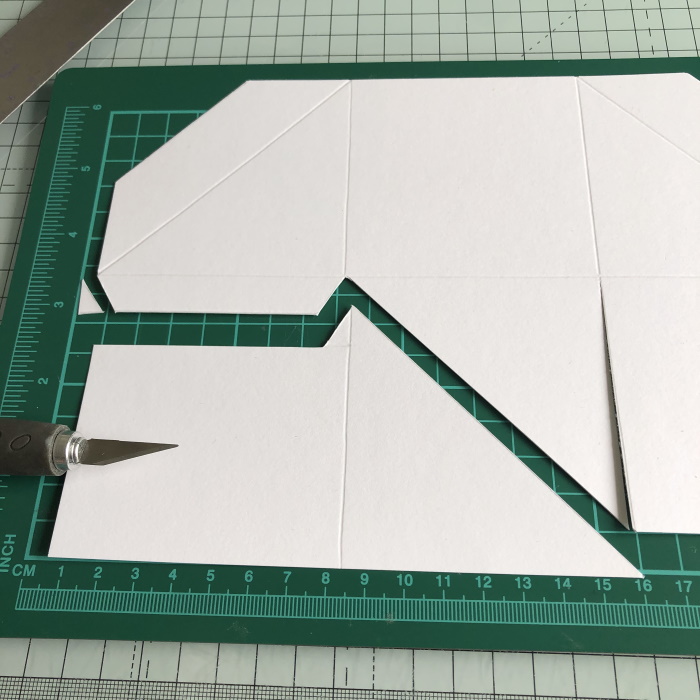
With the card facing so that the cropped corners are at the top, use a craft knife and ruler to cut the centre square on the bottom half diagonally from the top right to the bottom left.
Again using a craft knife, cut diagonally from the top right of the centre square down to the 3.5"scoreline.
Cut across the 3.5" scoreline to remove the whole piece.
Cut a wedge from the other end of the 0.5" section.
Finally, cut along the left edge of the centre square to make a triangle flap.
For the second part of the box, score the 6" x 11" on the long side at 3", 6" and 9". Turn and score it at 3" on the short side.
Cut away the top 2" section. The 2" section on the bottom will be the hinge that holds the box together.
As with the first piece of the box, score diagonally from corner to corner and again 1" out from that scoreline.
Repeat on the other end of the long side.
Cut away the corners.
Place the card on the scoring board with the uncut side at the edge and score at 2.5" (if the card is turned with the cut corners are along the side edge, score at 3.5")
With the 2" section on the right, cut the second scoreline up to the 3" intersecting scoreline.
On this piece you want to cut diagonally from top left to the bottom right of that square.
Repeat as for the first part of the box, making the 0.5" tab.
When both pieces are cut out, fold and crease all the scorelines with a bone folder.
Apply double sided tape to the inside of the 1" diagonal sections at the top of each piece and fold them inwards.
Fold up the triangle and apply adhesive to all sides. Remove the backing tape and fold the triangle in onto the square beside it. Apply tape to the 0.5" tab on the other side and bring that in on the other side to complete one side of the box.
Repeat the assembly instructions above for the second side of the box. Apply a generous amount of double sided tape to the inside of the hinge and adhere the other side of the box to it.
To create the drawers, cut three 4-5/8" x 4-5/8" squares and score each of them at 7/8" on all four sides. Cut to create tabs as shown below. Apply adhesive to the outside of the tabs and fold inward, adhering them to form the box shape.
To insert the drawers into the box, apply double sided tape around the top of two sides. This will adhere to the side and the back inside of the box. Because we only need to add adhesive to one side of the bottom drawer, place the drawer into the box without removing the tape backing, mark where the edge is and apply adhesive to the part that will be sitting on the bottom of the box. Remove all the tape backing and carefully slide the drawer to the back, before pressing it in place.
Turn the box upside down to adhere the top box, again, applying adhesive around two sides of the box. Slide the drawer in and then press into place.
To adhere the third drawer in the middle of the other side of the box, apply double sided tape around the two edges and only peel back one edge. Lie the box on it's back so that you can see between them. Adhere the drawer centered between the top and bottom drawers on the other side. Once you are happy with the position, remove the rest of the tape backing and press into place. Close up the box to make sure the drawers don't obstruct each other.
To help keep the box closed, cut a little piece of card and adhere it to the inside of the bottom, on the side with no drawer. You want the little piece of card to slide under enough that it just catches the double sided tape used to on the bottom of the drawer.
At this point, if you want to add ribbon, cut two pieces of white ribbon approx 7" long and adhere them to each side of the box opening - approximately 1" in.
To make all the layers, cut:
5x white card squares at 3" x 3"
4x black card squares at 2-7/8" x 2-7/8"
1x black card square at 2.75" x 2.75"
4x patterned paper squares at 2.75" x 2.75"
1x patterned paper square at 2.5" x 2.5"
5x Stitched circles at 2.75" (white card)
3x stitched circles at 2.5" (white card)
2x stitched circles at 2.5" (patterned paper)
Diagonally cut one of the 3" white card squares, the 2.75" black card square, and the 2.5" patterned paper square. Adhere them together to make two panels for the top of the box.
Cut the two patterned paper stitched circles using a wavy border, or cut them free hand.
For the side layers, adhere one of the white card squares, one of the black card squares and one of the patterned paper squares together. Repeat for all four sides.
Take three of the larger circles and adhere a smaller circle to it. Then adhere the half pieces of patterned paper to each of them. One of these will be for the top, for the sentiment.
Stamp the sentiment using black ink.
Adhere all the panels to the sides and top of the box. Decide which way you will be displaying the box and position the sentiment to suit. As we want both images to be seen, this box will be displayed with the closure facing front.
Apply foam tape only to half of the sentiment, as the box needs to open and close. Set the box aside for now.
To stamp the images, first cut your white card using a 2.5" circle die. Leave the die in place. Stamp the image pressing firmly where the stamp crosses the die.
Colour both images with your desired medium and then adhere them to the remaining two 2.75" circles. Add a little tab for decoration. Using foam tape/dots, adhere the image circles each side of the box opening, and adhere the other circle panels to the other two sides of the box.
Finally, cut six strips of paper measuring 0.75" x 2.75" and adhere them to the exposed sides of the drawers.
Embellish as desired.
For more inspiration check out the Stamping Bella Sisterhood page over on Facebook, where you can add your own Stamping Bella creations.
I coloured the images with copic markers - way too many to list. The papers I used are from Pion Design. I have so many gorgeous papers that I've been hoarding, but now it's time to use them! The waterfall die and add-on set are from Lawn Fawn. As always, my cardstock is from Papermilldirect. I cannot recommend this card enough. I use it to make all my card bases and the quality is second to none.
This month's Stamp of the Month is Bubble Chicks and you can grab it at 25% off for the month of May, while stocks last.
For more inspiration check out the Stamping Bella Sisterhood page over on Facebook, where you can add your own Stamping Bella creations.