Pages

Friday 30 October 2020

Bundle Girl on a Swing | Stamping Bella Bellariffic Friday

Happy Friday!! Today I am sharing my Stamping Bella Bellariffic Friday card.
Our theme this week is

Newest Release Showcase

My card features Bundle Girl on a Swing


Copic Markers:
Skin - E04, E11, E00
Clothes - RV52, RV55, RV63, RV66
Boots - E42, E43, E44
Branch - E31, E33, E35
Leaves - YG17, YG21, YG23


Other Products Used:
Card - Papermilldirect.
Paper - Clearly Besotted Kit
Grass Border Die
Clouds Stencil 
Distress Oxide Inks

The October stamp of the month is Oddball Girl Mummy. You grab her at 50% off for the whole month of, while stocks last.

For more inspiration check out the Stamping Bella Sisterhood page over on Facebook, where you can add your own Stamping Bella creations.

My Social Media Sites
   

Thursday 29 October 2020

Exploding Drop Down Gift Box | Stamping Bella Tutorial

Hi all! Today I'm sharing another Stamping Bella tutorial, a Drop Down Exploding Gift Box featuring Quinn and her Boots. The box is quite large at 6.25" x 4.25" and the three gift boxes in side measure 4" x 2.5", big enough to hold hot chocolate sachets, marshmallows and chocolates. Perfect for a winter gift. 


Supplies
White card
Patterned paper
Scoring board and bone folder
Adhesive
Hill border die
Scalloped rectangle die
Embellishments

How to:
Cut three pieces of white card measuring 6.5" x 8", one piece of  6.25" x 8.25", and one piece of 9-3/8" x 11.5" 

Score the  6.25" x 8.25" piece at 1" on all four sides. 


Score the 9-3/8" x 11.5" on the 11" side at 2-5/8" x 8-7/8", and on the 9-3/8" side at 2-5/8" and 6.75"


Score all three 6.5" x 8" pieces at 2" on all four sides. 


For all three piece of 6.5"x 8" pieces - 
Cut on the 8" side on each of the score lines up to the intersecting line. Taper the edges of all 4 corner sections. Fold and burnish all the score lines. 


Apply adhesive to the outside of each of the four corners and adhere to the inside of the longer side panels to create a box. 


For each box cut two pieces of paper measuring 1-7/8" x 3-7/8" and two pieces measuring 1-7/8" x 2-3/8". Adhere to the sides of the boxes. 


To make the box lid: take the 6.25" x 8.25" piece of card and cut on the long side up to the intersecting score line. Taper the edges of the four outer sections to make tabs. 


For the decorative panels cut:
Card:
7/8" x 6-1/8" (2)
7/8" x 4-1/8" (2)
6-1/8" x 4-1/8" (1)
Paper:
0.75" x 6" (2)
0.75" x 4" (2)
6" x 4" 

Adhere the paper layers to the card layers and then adhere them to the top and sides of the lid. 


Apply adhesive to the outside of the corner tabs and adhere them to the inside of the longer side panels. 


To create box base:
Take the 9-3/8" x 11.5" piece of card and cut on the score lines to remove the four corners. Fold and burnish the score lines. 


For the outside panels:
Card:
6-1/8" x 2.5" (2)
4-1/8" x 2.5" (2)
Paper:
6" x 2-3/8" (2)
4" x 2-3/8" (2)


Inside panels:
Card:
6" x 4" (centre panel)
Paper:
5-7/8" x 3-7/8" (centre panel)
6-1/8" x 2.5" (2)
4-1/8" x 2.5" (2)


Once all the layers are stuck down, adhere the boxes as shown. Ensure each box is right up to the score line.


Fold up all 3 boxes and pop the lid on to ensure it fits. 
Set the box aside to work on the image. 


Stamp Quinn onto white card and colour using your preferred medium. 


Fussy cut the outline using a precision scissors. 


Assemble a panel for the front of the box and adhere down using 3D foam tape/dots.


Stamp the sentiment and cut out using a scalloped die. 


Adhere the sentiment and Quinn to the front panel using more 3D foam tape/dots. 
Embellish as desired. 


To make the acetate lids for the boxes inside:
Cut three pieces of acetate measuring 6" x 4.5" and score on all four sides at 1"


Cut on the score lines to remove the four corners. Cut a slight wedge from each side of the four outer tabs. Fold the score lines gently. 


Push the acetate lid into the box - it will be a snug fit so that it stays in place. 


Decorate the outer edges of the boxes. 


For more inspiration check out the Stamping Bella Sisterhood page over on Facebook, where you can add your own Stamping Bella creations.

My Social Media Sites


Friday 23 October 2020

Oddball Birthday Queen | Stamping Bella Bellariffic Friday

Happy Friday!! Today I am sharing my Stamping Bella Bellariffic Friday card.

Our theme this week is

Photo/Colour Inspiration


My card features Oddball Birthday Queen and I've made a slimline card to put her on. 
I used a brick stencil and distress oxide inks to make the background, onto which I placed a large filmstrip. 


Copic Markers:
Skin - E04, E11, E00
Hair - E33, E50, E53
Dress - R35, R37, R39, R89
Crown - YR18, YR16, YR12
Shoes - C5, C9
Cake - YR18, YR16, YR12. R35, R37, R39
White highlighter pen. 


Other Products Used:
Card - Papermilldirect.
Distress Oxide Inks
Slimline Filmstrip Die
Pennant Die

The October stamp of the month is Oddball Girl Mummy. You grab her at 50% off for the whole month of, while stocks last.

For more inspiration check out the Stamping Bella Sisterhood page over on Facebook, where you can add your own Stamping Bella creations.

My Social Media Sites
   

Thursday 22 October 2020

Squidgy Ornament Box | Stamping Bella Tutorial

Hi everyone! Today I'm sharing how I made this Squidgy Ornament Box. I saw a box similar to this on YouTube but it was quite small so I adapted it to make it big enough to hold one of those handmade Christmas ornaments, which are usually around 3.25" in diameter.  

The stamp I used is from the Angels Squidgies Ornament and Bell set and the sentiment is from the Christmas Sentiment set. 


Supplies:
White card
Christmas themed papers
Scalloped and stitched circle Dies
Stitched rectangle die
Ribbon
Foam tape/dots, adhesive

How to:
Cut two pieces of card measuring 9" x 7.75" 
Score on the 9" side at 2.75" and 6.25"


Score on the 7.75" side at 0.75", 3,5", and 7" 


Flip the card back around so that the 9" side is along the top and the 3.25" square in the middle is above the smaller section (as shown below) 
Score at 2" and 7" down to the intersecting score line. 


Fold and crease the score lines with a bone folder. 


On the 2" and 7" score lines, cut down to the intersecting line. 


On the back, draw a line from the where you just cut it, down to the outer edge of the next score line. Cut on the line to remove that whole section. 


Repeat on the opposite side. 


Cut across the centre score line to the intersecting line, on both sides of the centre panels. 


Cut away the 2 outer sections on the bottom. 


Fold up the bottom part of the box and place the wing over the side panel. Mark the edge of the wing with a pencil. 


Cut diagonally from the pencil mark, down to 0.75" score line, on both sides.  
On the top0.75" section, cut the 2 score lines down to the intersecting line to make tabs. 
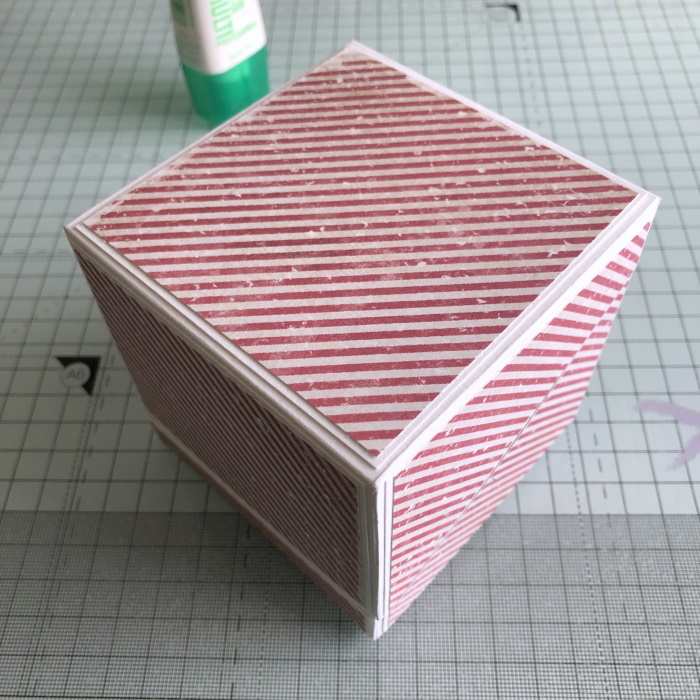
This is how it should look at this point.


Apply glue to the smaller wing and fold it in under the outer wing. 
If there is any overhang cut it away with a scissors. 


Repeat on the other side to make the box top/bottom shape. 


Apply adhesive to the tabs, fold them in and adhere the 0.75" front section to them. 
This completes one half of the box. Repeat all the above steps to make the other half. 


On ONE of the pieces only, apply adhesive to the inside of the 0.75" section and adhere it on the inside. This piece will be the top of the box. 


For the panels, cut:
1x  white card  3 3/8" x 3 3/8" (top)
2x  white card 3.25" x 3.25" (sides)
2x  white card 3 3/8" x 2 5/8" (front and back)
2x  white card 3 3/8" x 5/8" (front and back)

1x paper 3.25" x 3.25" (top)
2x  white card 3" x 3" (sides)
2x paper 3.25" x 2.5"
2x paper 3.25" x 0.5"


On the side pieces of white card (3.25" x 3.25"), measure up 5/8" on one side, and down 5/8" on the opposite side. 


Cut from one pencil mark to the other to create the side panels. 


Use the card side panels as a guide for cutting the paper panels. 


Adhere all the panels to both halves of the box. There is no panel for the bottom of the box, however you can put a 3.25" white card square to finish it off if desired. 


Apply adhesive to the outside of the 0.75" section and adhere inside the back of the top half of the box to make the hinge. 


Close up the box to ensure it fits well. 


Cut a piece of contrasting paper measuring 10 3/8" x 2.75" Fold it evenly in 3 and crease the edges. 


Apply glue to the inside of the sides and front of the bottom half of the box. 


Adhere the contrasting paper. 


Cut a piece of ribbon approx 2" in length. Fold in half  and use hot glue to adhere it together. 
Red line tape is also strong enough to hold it if you don't have a hot glue gun. 


Adhere the pull tab inside the front of the top of the box. 


Stamp the Angels Squidgies Ornament onto white card and colour using your preferred medium. 


Cut out using a precision scissors


Cut a selection of circles to layer. The largest circle here is 3 1/8" and the smallest is 2.75" 


Adhere all the circles together and then adhere the Angels Squidgies Ornament using 3D dots. 


Stamp the sentiment from the Christmas Sentiment set and cut out using a stitched rectangle. 


Decorate the box as desired and adhere the sentiment to the front. 


For more inspiration check out the Stamping Bella Sisterhood page over on Facebook, where you can add your own Stamping Bella creations.

My Social Media Sites