Hi all. Today I'm sharing how I made a New Home Cottage Gift Box featuring the Little Bits Flower Pots, Fall Window and Celebrate and Congratulate Sentiments stamps
I have a long list of crafty makes that I've been trying to find time to do and this one has been on that list for a long time. There are a few versions of this around social media but this is my take on it. I would probably make the roof a little shorter next time, maybe take an inch off the height.

Supplies:
White card
Kraft card
Paper
Scalloped Border die
Stitched Pennant die
Scoring board and bone folder
Acetate
Ribbon
Adhesive
How to:


Colour the Flower Pots as desired and fussy cut around the outline.


Cut 2 pieces of card measuring 10.25" x 7.75". The scoring and cutting is the same for both pieces.
On the 7.75" side, score at 2.5" and 7.25"


Fold and crease all the score lines. Cut on the 7.75" on each of the scorelines, up to the intersecting score lines. On the 0.5" end, remove the top and bottom section and taper the edges of the remaining centre section. On the 2.5" end, taper the edges of each side to make the fold in tabs.

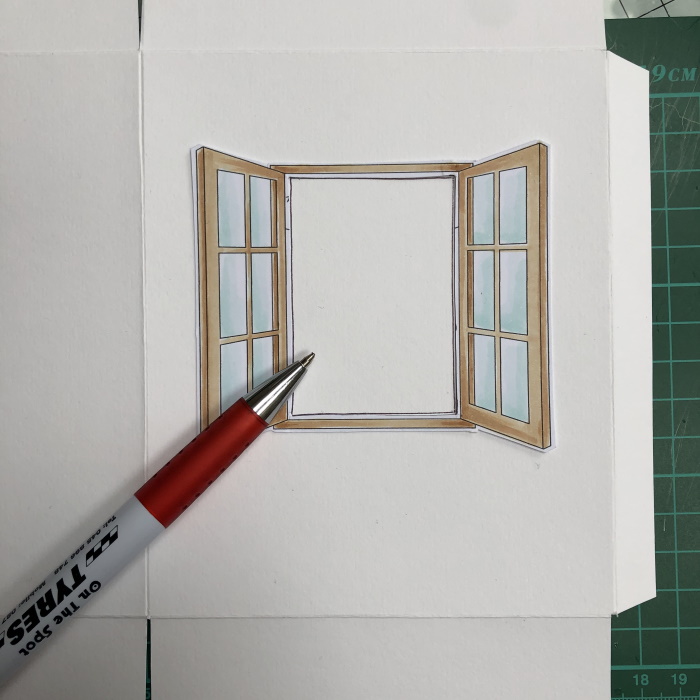
One ONE of the pieces, with 2" section at the top, position the window as shown and draw a pencil line to mark the centre of the window


Cut the panels for the front and back.
2x 5-5/8" x 4-5/8"


Apply double sided tape to the 0.5" section on the back piece and adhere to the front to make the box shape.


For the roof:
Cut 2 pieces of Kraft card measuring 4" x 5.25"


Continue to layer the scallops as shown until the whole piece is covered up to the score line.


On the 2" section at the top, apply adhesive and position the roof section with the scallops on it. Let it overhang the front of the box by 0.5"-0.75". Make sure it's centered across.


Using two stamps from the Celebrate and Congratulate Sentiments set, make a greeting and cut out with a pennant die.


For more inspiration check out the Stamping Bella Sisterhood page over on Facebook, where you can add your own Stamping Bella creations.
My Social Media Sites


1 comment:
Wow so beautiful and creative x
Post a Comment