Pages

Thursday, 25 August 2022

Inverted Z-Fold Card | Stamping Bella

Hi all. I'm back today with another Stamping Bella tutorial, an Inverted Z-Fold Card featuring Gnome with a Surfboard. I'm clinging onto the last of summer before back-to-school and Autumn are upon us. 

This card is a wonderful display card with loads of room on the back for handwritten messages. It also folds up into an A2 card (4.25" x 5.5") for mailing. It is a relatively easy card to make, using just one piece of card for the base. 


Supplies:
White card
Nautical themed papers (used: P13, Beyond the Sea)
Scoring board, bone folder
Stylus, ruler, pencil, eraser. 
Stitched circle and Pennant dies
Adhesive, foam tape/dots. 

How to:
Stamp Gnome with a Surfboard on to white blending card and colour using your preferred medium. Fussy cut around the outline. Stamp the Surf's Up sentiment onto white card and cut out using a pennant die - fishtail both ends. 


Cut:
White card:
8.5" x 5.5"
5/8" x 5-3/8"
5/8" x 3-7/8"
5/8" x 3-3/8" (x2)
2" x 5-3/8" (x2)
3-3/8" x 3-7/8"

Paper:
0.5" x 5.25"
0.5" x 3.75"
0.5" x 3.25"" (x2)
1-7/8" x 5.25" (x2)
3.25" x 3.75"

Take the 8.5" x 5.5" piece and measure in on the long side at 0.75" from the top and both sides. Draw a line from 0.75" to 5" top and bottom as shown. 


Using a craft knife, cut along the lines from the 0.75" mark to the 5" mark. 


Score on the long side in between the cut lines, at the 0.75" mark, 1.5" and 5" 


Score either side of the cut lines at 4.25"


Score from top to bottom at 6-3/8"


Mountain fold the 0.75", the 4.25", and the 5" score lines. Valley fold the 1.5" and 6-3/8" score lines. 


Crease all the score lines until the card can fold up into a 4.25" x 5.5" card with ease


Take one of the 2" x 5-3/8" pieces of card and measure in from each end on the long side at 5/8". Measure across 0.75" on both ends and draw a line 


Cut on the lines to remove the piece. 


Repeat with one of the 1-7/8" x 5.25", measuring down 0.5" and in 0.75"


Adhere all the card panels to the card base, then adhere all the paper panels. 


Cut a 3" stitched circle and adhere to the centre panel


Cut some nautical die cuts, or cut elements from the nautical papers, to embellish the card. 


Adhere the Gnome with a Surfboard and sentiment strip onto the circle using foam tape/dots. Embellish the card using the die cuts or paper elements. 


For more inspiration check out the Stamping Bella Sisterhood page over on Facebook, where you can add your own Stamping Bella creations.

Where you can find me


Thursday, 18 August 2022

Floating Gatefold Halloween Card | Stamping Bella

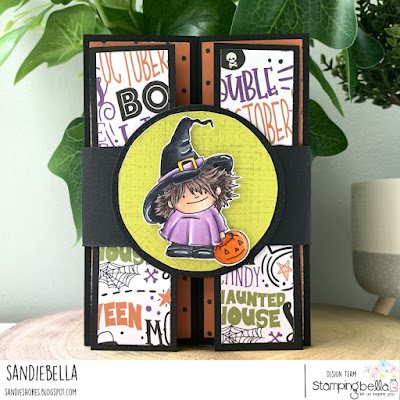
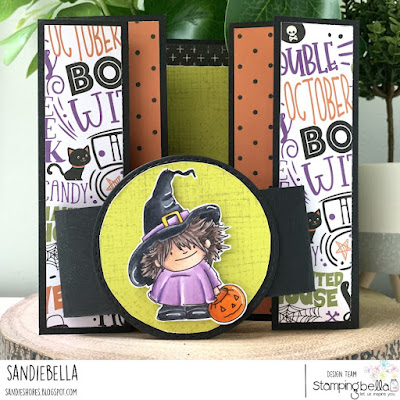
Hi all, today I'm sharing how I made this Floating Gatefold Halloween Card featuring Stamping Bella Halloween stamps and sentiments. Halloween is one my favourite holidays to make cards and home decor for. 


Supplies:
Halloween themed papers
Scoring board and bone folder
Stitched circle die
Precision scissors
Adhesive
Embellishments (optional)

How to:
Stamp the Trick or Treater characters onto white blending card, colour using your preferred medium, then fussy cut around the outlines. 
Set aside to work on the card. 


Cut black card:
Card base - 5.5" x 7"
Large panels - 5.5" x 2" (x2)
Small panels - 5.25" x 1.5" (x2)
Floating mechanism - 4.5" x 1.5" (x2)
Belly band - 1.75" x 10" 

Cut white card:
Sentiment strip - 0.5" x 3.75" 

Cut designer paper:
Large panels - 5.25" x 1.75" (x2)
Small panels - 5" x 1.25" (x2)
Centre panel - 5.25" x 3.75"
Greeting panel - 4.25" x 3"


Score the card base on the 7" side at 0.5", 1.5", 5.5" and 6.5"


Turn to the short side and score at 0.5" to the intersecting 0.5" score line, and from the 6.5" score line down to the edge. 


Score both floating mechanisms on the short side at 0.5" and 1"


On the card base, cut across the 0.5" score line and then cut diagonally to the inner score lines. 


Adhere the paper layers to the large and small panels. 


With the inside of the card facing up, fold in on the 1.5" score lines and then fold back the 0.5" score lines. Crease well with a bone folder 


Apply adhesive to the 0.5" sections then, keeping the score lines pressed flat, adhere the large panels down, lining up the outer edges with the edges of the card base. 


Fold the floating mechanisms into a Z shape, in opposite directions. The should both pull outwards. 


Apply double sided tape to the underneath of the inner 0.5" section. Line up with the bottom of the card and adhere approx 1/8" in on the designer paper. Repeat on the opposite side.


Apply adhesive to the top of the pull mechanism and adhere the small panels - lining up the bottom and outer edges


Adhere the centre panel


Stamp the sentiment onto the white card strip. Adhere the greeting panel towards the top and then adhere the sentiment across the bottom. 


Adhere both Squidgy DINO Trick and Squidgy GHOST 'standing' on the sentiment strip. 


Centre the belly band card across the front of the card then fold both ends around to the back, leaving a little bit of wiggle room so that the band can slip on and off easily. Apply adhesive on each end and secure together. 


Cut a 3" black card circle and a 2.75" green paper circle. Adhere them together then adhere the Squidgy WITCH using foam tape/dots. 


Apply glue to the centre of the belly band and adhere the circle panel to it. 


For more inspiration check out the Stamping Bella Sisterhood page over on Facebook, where you can add your own Stamping Bella creations.

Where you can find me