Pages

Showing posts with label First Edition. Show all posts

Thursday, 15 October 2020

Curvy Girl Fan Fold Card | Stamping Bella Tutorial

Hi all! Today I'm sharing how I made this Fan Fold card. The stamp I've used is Curvy Girl with a Newborn

This card is so quick and easy to make and fits into a standard 5" x 7" envelope, and can also be easily adapted to make different sizes to suit your needs. 


Supplies:
White Card
Patterned Papers
Scoring board and bone folder
Hill Die, Stitched Sentiment Die, Baby Clothes Die (optional) 

How to:
Cut a piece of white card measuring 7" x 9". 
On the 9" side, score at 1.5", 3", 6" and 7.5"


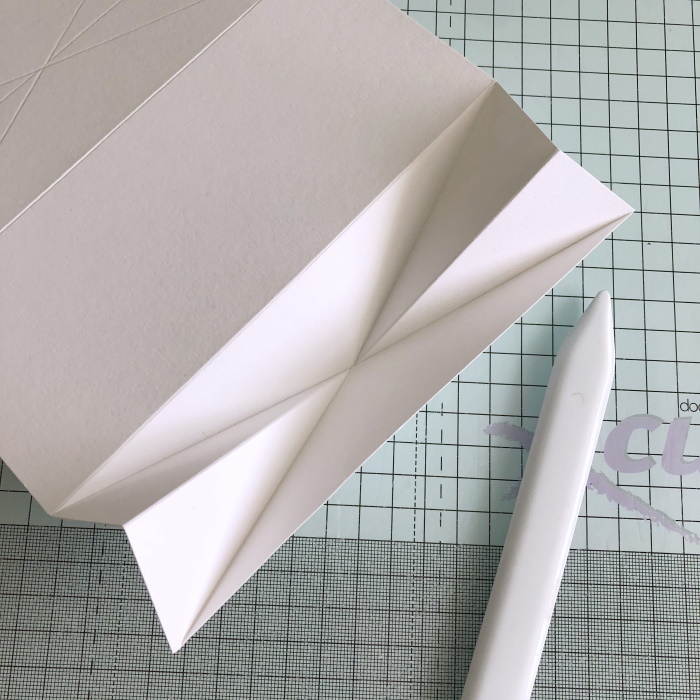
Using a ruler and embossing tool, score from the top left corner, diagonally down the bottom of the 3" score line. Then score from the top of the 3" score line down to the bottom outer corner to make an X 


Repeat on the opposite end, leaving a 3" section in the centre of the card. 


Turn the card with the back facing upwards and fold the 3" and 6" score lines back. 


Valley fold the diagonal score lines


Then mountain fold the peaks in the centre. 


Fold the sides in to create the fan. Crease the score  lines well with a bone folder 


For the layers:
Cut 2 pieces of white card measuring 6.75" x 2.75"
Cut  piece of patterned paper measuring 6 5/8" x 2 5/8" and 2 more pieces in contrasting colour at 6.75" x 2.75" 
Cut one piece of patterned paper 2 5/8" wide and approx. 3" tall for the accent at the bottom of the card. 


Adhere the 6 5/8" x 2 5/8" piece of paper to one of the card pieces and adhere to the centre panel of the card. 


Take the 6.75" x 2.75"  pieces of contrasting paper and draw an X on the back, from corner to corner as shown


Cut both pieces along the X to create the pieces for the fan shape


Fold the top and bottom triangles and crease them with a bone folder. Alternatively, you can cut them in half along the centre. 


Adhere all the pieces down on the side panels. 


Adhere the other white card piece to the back of the centre panel. This can be used for writing a personal message. 


Cut a piece of contrasting card using a hill die - this piece is 1.5" tall x 2 5/8" wide. 
Stamp the sentiment from Curvy Girl with a Newborn and cut out using a slim stitched rectangle die. 


Adhere the contrasting panel at the bottom of the centre panel and then adhere the sentiment using 3D foam tape/dots. 


Stamp Curvy Girl with a Newborn onto white card and colour using your preferred medium. 


Fussy cut using a precision scissors, or use the coordinating outline die (now discontinued) 


Adhere Curvy Girl with a Newborn onto the card front using 3D foam tape/dots


Decorate as desired. 


The October stamp of the month is Oddball Girl Mummy. You grab her at 50% off for the whole month of, while stocks last.

For more inspiration check out the Stamping Bella Sisterhood page over on Facebook, where you can add your own Stamping Bella creations.

My Social Media Sites
   

Thursday, 25 June 2020

Big Sister Rocker Card Tutorial | Stamping Bella

Hi all! Today I'm sharing my Stamping Bella tutorial showing how I made this Rocker Card featuring Tiny Townie Big Sister. The coordinating CUT-IT-OUT die for this stamp is still available but once the current stock is sold it will be discontinued, so if you must have it (and you must!) now is the time to nab it. 


Supplies: 
White card
Designer paper (First Edition- Hey Baby)
Doily Circle dies
Stitched Circle dies
Stitched Rectangle die

How To:
For the card base cut a doily circle from white card measuring approximately 5.5" and a stitched circle from paper measuring 5.25"


Score the doily at 2.75", fold and crease with a bone folder.


Cut the paper circle in half and trim a little bit from the top of each half.


Adhere the paper front and back of the card base.


Cut another circle from white card, measuring approximately 4" and a paper circle measuring 3.75". Adhere them together.


Apply foam tape only to the bottom half of the circle panel.


Adhere the smaller circle to the card base, as shown, and set aside to work on the image.


Stamp Tiny Townie Big Sister onto white card and colour using your preferred medium.


Cut the image out using the coordinating die.


Stamp the sentiment onto white card and cut out using a stitched rectangle die


Decorate the front as desired.


Adhere the image to the card front using foam tape/dots.


Adhere the sentiment below the image on the card base.


For more inspiration check out the Stamping Bella Sisterhood page over on Facebook, where you can add your own Stamping Bella creations.

My Social Media Sites