Pages

Thursday, 16 July 2020

Tropical Squidgies Cascading Card Tutorial | Stamping Bella

Hi! It's Stamping Bella Tutorial Thursday and today I am showing how I made a summery Cascading Card featuring the fun Tropical Squidgies. This set consists of three stamps, a large and small version of the Squidgies and a sentiment. I used the larger of the two character stamps and the sentiment. 


Supplies: 
Card
Patterned paper
Scoring board and bone folder
Pencil and ruler
Circle Dies
Border Die (optional)
Embellishments

How to:
Cut 2 pieces of card measuring 12" x 5.5". 


On each piece, measure up 3" on one side (of the 5.5" side) and cut diagonally to the opposite corner.


Score both pieces at 4" and 8"


On both pieces, measure up half way on both sides (2.75" on the 5.5" side, and 1.5" on the 3" side) and draw a line from one side to the other.


On ONE piece, cut at the 6" mark down to the pencil line. On the bottom, cut upwards at 2" and 10" to the pencil line.
On the second piece, cut down from the top at 2" and 10", and up from the bottom at 6", to the pencil line.
Erase the pencil lines.


Fold and crease the scorelines.


Lay the two pieces flat, with the 5.5" sides together, slip one piece into the other at the cut marks.


Fold both pieces inwards and again, slip one piece into the other at the cut lines. Repeat for the last set of cut lines.


To create a panel for the front, cut a piece of card measuring 3.25" x 3-7/8" and lay it onto the front of the card. There should be a small border around the sides and the bottom. Use a pencil to mark where the top of the card is, on each side, and make a pencil mark at the centre of the top.


Cut diagonally from just under the side pencil marks to the pencil mark at the top.


Adhere to front of the card.


For the decorative panels, cut two each of:
1-7/8" x 5-3/8"
1-7/8" x 4.5"
1-7/8" x 3-5/8"

Without applying adhesive, place a piece of the paper into the card and move into position.


Turn over to the back and make a pencil mark on the shortest side to get the angle.


Cut approx 1/16" below the pencil line up to the opposite corner. Use this piece as a guide to angle the other five pieces, paying attention to which side the angle falls. Adhere all the pieces to the card base.


For the front panel, cut one piece measuring 3-1/8" x 3.75". Using card panel as a guide, cut the top at an angle and stick it down.


Stamp Tropical Squidgies onto white card and colour using your desired medium.


Fussy cut around the image.


Cut a scalloped circle (3.25") from card, and smaller stitched circle (2.75") from paper and adhere them together.


Cut some borders - enough for the top of each section of the card base.


Cut the borders to size and stick at top of the card, as shown. Adhere the circle panel to the card front.


Using foam tape/dots adhere the Tropical Squidgies onto the circle panel.
Stamp the sentiment onto card and cut out using a label or tag die, string some white twine though the hole and then, with the card open and in the standing position, adhere the sentiment to the panels behind the image.


Decorate with stickers and enamel dots. 


For more inspiration check out the Stamping Bella Sisterhood page over on Facebook, where you can add your own Stamping Bella creations.

My Social Media Sites
   

Tuesday, 14 July 2020

The Daily Marker 30 Day Challenge | Clearly Besotted

Hi! Today I'm sharing a few cards I made for The Daily Marker 30 Day Challenge
All of the cards feature Clearly Besotted stamps (digital and clear). 

On this first card I used the July 2020 release stamps, Scene it Around and All Four Seasons Hippos. There are 22 little hippos in the set and are perfect for building seasonal 'scene' cards. The sentiment is included in the Scene it Around set. 


This card features Jungle Plushies from the June 2020 release. 
Anyone else absolutely loving the slimline cards that are trending right now? They are great for creating a story on cards. I won't even mention the dies that are popping up everywhere, I need a second job to fund it all, lol. 


This last project is a tag that will eventually take centre stage on a card. The image on this tag was a freebie while we were on lockdown, and is no longer available, but I knew it would be perfect for the 30 day marker challenge. 
For the background I used the Splat It! stencil and distress oxide inks. 


If you are participating in the marker challenge, drop me a link to your blog/insta/youtube in the comments!

My Social Media Sites
   

Friday, 10 July 2020

Too Much Holiday Spirit | Stamping Bella Bellariffic Friday

Happy Friday!! Today I am sharing my Stamping Bella Bellariffic Friday card.
Our theme this week is

 Vintage

My card features Milk and Cookies Gnome and a sentiment from Festive Gnome Sentiment set


Copic Markers:
Skin - E04, E11, E00
Hat/Straw - R35, R37, R39
Shoes - C3, C5, C7
Tag - E40, E41, E42. C1, C3
Ground - W1, W3, W00
Cookie - E21, E3, E25, E33, E29

Other Products Used:
Card - Papermilldirect.
Paper - Echo Park
Wonky Stitched Rectangle Die

The Stamp of the Month for July is Flowery Gnome, You can grab the Stamp and coordinating Die at 50% for the whole month, while stocks last. Once the Die is sold out it won't be restocked so be sure to grab it while you can.

For more inspiration check out the Stamping Bella Sisterhood page over on Facebook, where you can add your own Stamping Bella creations.

My Social Media Sites
   

Thursday, 9 July 2020

Tealight Card Tutorial | Stamping Bella

Hi all and happy Thursday! 
I'm back with another tutorial for Stamping Bella. I'm always looking for something different to make so when I found a pack of 6" x 4" vellum in my craft room I decided to find a use for that in my tutorial. I have seen tea light cards around, on Instagram and Pinterest and I loved them so that's what I've made today. 
You can make these any size, but this one folds up to a 5.5" x 4.25" card for easy mailing. 


Even with the tealight turned off this card makes a great display card. 


Supplies:
Card
Rectangle Die
Scoring board and bone folder
Patterned paper
Embellishments
Battery operated tealight candle

How to:
Cut two pieces of card measuring 11" x 4.25"
Score both pieces at 2.75", 5.5", and 8.25". Fold and crease the score lines.


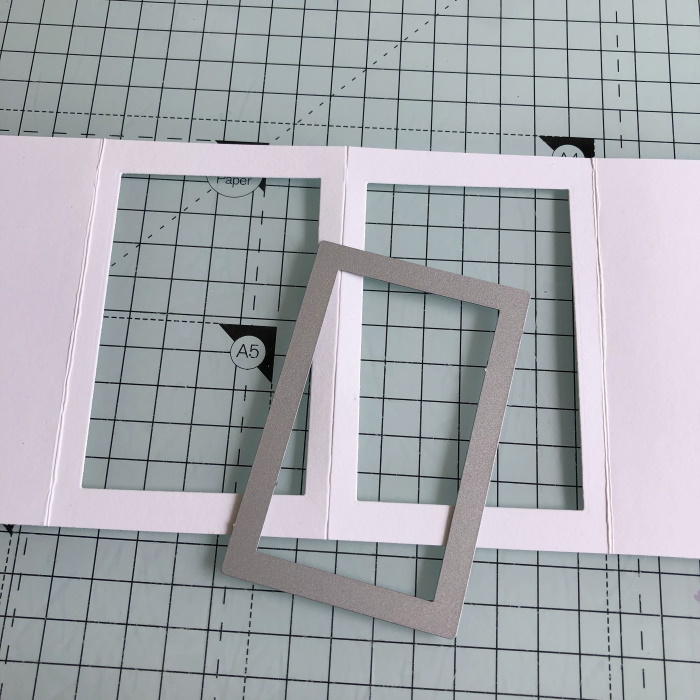
Take one piece of card only, and using a rectangle die approx 3.5"H x 2.25"W, cut a window in the middle two sections.


Mountain/Valley fold the piece of card with the windows cut out so that the centre is in the mountain position, and fold the other piece so the centre is in the valley position.


Cut two pieces of card measuring 4-1/8" x 2-1/8" and two pieces of paper measuring 4" x 2" Adhere each piece of paper to a piece of card.


Adhere the panels to each end of the piece with the windows.


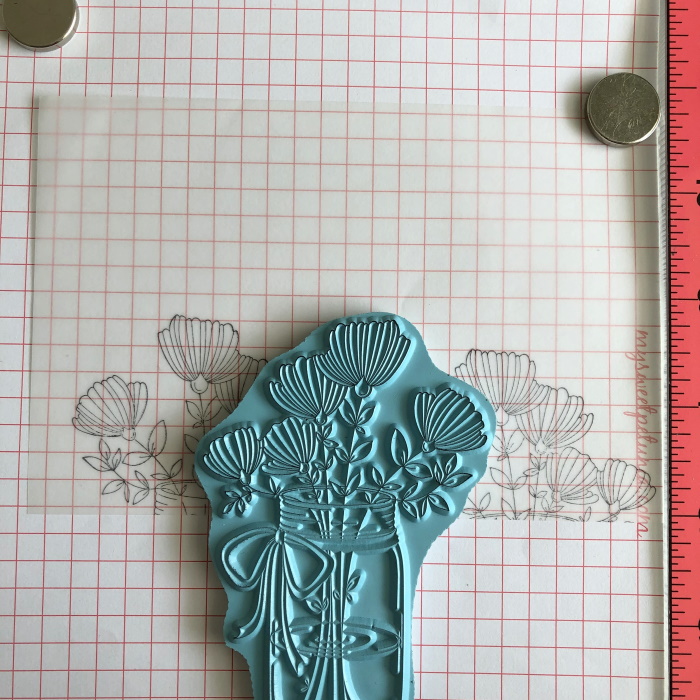
Ink just the flowers on the Mason Jar of Flowers stamp and stamp the flowers across the bottom of a 6" x 4" piece of vellum


Position the vellum behind the windows and adjust it until you are happy with the placement of the flowers.


Trim the vellum as necessary to get your placement.


Colour the flowers with copic markers, or pencils.


Turn the front section of the card over to the back and apply a narrow strip of double sided tape around the windows.


Adhere the vellum to the double sided tape.


Stamp the sentiment from the Mason Jar of Flowers onto white card and cut out using a decorative rectangle, or similar.


Decorate the front of the card as desired.


Cut two pieces of coordinating paper measuring 4-1/8" x 2-1/8" and adhere to the inside middle sections of the card back.


Apply adhesive to the end sections of the card front and adhere them to the end sections of the card back.


Place the card over a battery operated tealight to display.


For more inspiration check out the Stamping Bella Sisterhood page over on Facebook, where you can add your own Stamping Bella creations.

My Social Media Sites