It's day 9 of our 12 Days of Christmas Waltzing Mouse Style and today I would like to share a 'how to' on making some holiday tags. I love to make my own gift tags and they are so quick and easy to do.
Usually at this time of the month we would be previewing the new stamp releases, however Claire is taking a break from releasing new stamps to relax and enjoy the holidays with family and friends, as well as letting her focus on some exciting behind-the-scenes work! So please bear with us, it will be sooooooo worth it :D
In lieu of a release this month we bring you the Twelve Days of Christmas Waltzingmouse Style! Every day, through to Dec 17th one of the DT members will host a tutorial on their blog. Be sure to check the WMS Blog for the links.

Materials I have used:
Stamps - Very Vintage Labels 2, Vintage Ornaments, Around Christmastime, Festive Foliage, Compliments of the Season, Pic-Nic Patterns
White Cardstock
White Cardstock
Selection of Distress Inks
Selection of co-ordinating ribbons
Ink Blenders
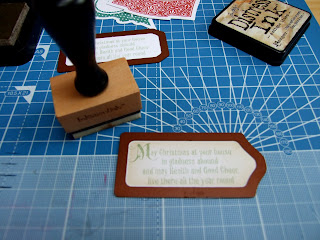
Step 1 - Stamp out a selection of sentiments and designs using various distress inks. I used Fired Brick, Pine Needles & Bundled Sage.
Step 2 - Ocne you have finished stamping cut out each design using the co-ordinating die.
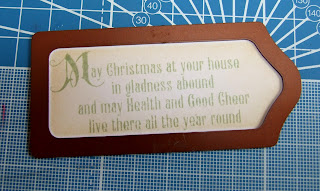
Step 3 - Distress the tags with an ink blender and antique linen distress ink. For my 2 sentiment tags I leave the die cut on until I have finished distressing and it leaves a white border all around. If you prefer not to have the white border remove the die before distressing.
Step4 - Once you have finished distressing to you liking remove the dies and taking a crop-a-dile, or other hole punch, make a hole on the top of each tag.
Step 5 -Thread co-ordinating ribbon through the hole leaving a good length in case you want to tie onto gifts/around bottles. Embellish the tags as desired.
And there you have it. Simple tags that add a personal touch to your gifts. I've also made some co-ordinating gift wrap using plain white paper, fired brick distress inks and the Pic-Nic stamp set.
Thanks for popping in today!
Sandie
xXx
And there you have it. Simple tags that add a personal touch to your gifts. I've also made some co-ordinating gift wrap using plain white paper, fired brick distress inks and the Pic-Nic stamp set.
Thanks for popping in today!
Sandie
xXx


18 comments:
Beautiful!
How wonderful. Thank's for sharing inspiration!
Love your tags! Beautiful!
Fantastic!
Been taking a tour on your blog now. You do make so adorable cards. They are so beautiful. I like how everything goes so well together.
Wish you a great week.
All the tags and packaging are beautiful! TFS your ideas!
Beautiful tags and gift-wrapping Sandie! These look quick and easy in addition to stunning!!
SO pretty, Sandie! I love how you sponged around the nesties...makes your tags all warm and glowy!
Love all your tags Sandie! what great ideas and each so different!
Sandie - thanks for sharing your lovely tags (and paper). They're really super. I am really enjoying these 12 days of Christmas!
Awesome tags, thanks for sharing!
These are lovely Sandie! I spend so much time making cards that I forget to make tags until it is too late (when I went to grab some in a store recently my husband said 'wait... don't you MAKE those?!!' I was so embarrassed!
Awesome tags and wrapping paper Sandie! Love all the distressing! Thanks for sharing the process!
thanks for the inspiration!
Sandra
One can never have enough tags at Christmas! Inspirational and fabulous! I love the simple sentiment ones...all of them are awesome, I just like those with a great message instead of my usual to and from!!!
Great project, thanks for sharing ... Need to have these tags from Spelbinders ;-)
carole
http://www.lescartesdecarole.fr
Wonderful ideas - so inspiring!! I love how you wrapped up the gift, too! Nice work!
Love these tags.
Post a Comment