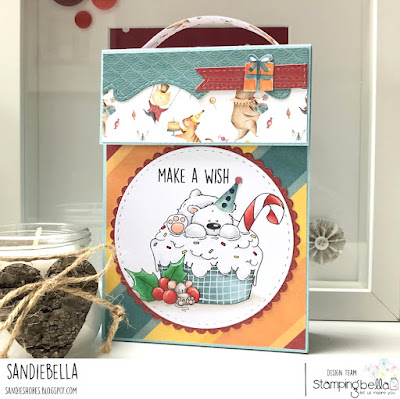
Hi everyone! Today I am sharing my take on an Accordion Album, featuring Polar Bear on a Cupcake. While this image leans more towards Christmas crafts, I thought it made a great Birthday image too, especially for those who have Winter Birthdays. I gave the polar bear a party hat which was cut from the papers.
The album is made to hold standard 6" x 4" photographs, however you can also make tags and use smaller photos, and add some journaling. The magnet closure is strong enough to hold the album closed while carrying it by the handle. You can also use Velcro, instead of magnets, but I find that to be quite bulky at times.
Supplies:
Card
Designer Paper (used - P13 : Happy Birthday)
Scoring board and bone folder
Pencil and ruler
Stitched and Scalloped circle dies
Border and pennant dies
Adhesive
Magnets
Embellishments
How to:
Stamp Polar Bear on a Cupcake onto white card and colour using your preferred medium. Cut the image out using a 3.75" stitched circle die and cut a 4" scalloped circle from designer paper. Adhere them together and set aside to work on the album.
For the album, cut card pieces -
(2x) 6" x 10"
(1x) 6-1/8" x 4.25"
(1x) 11-5/8" x 4.25"
(11x) 6" x 4.25"
Paper layers -
(2x) 6" x 4-1/8"
(3x) 1-5/8" x 4-1/8"
(2x) 1-7/8" x 4-1/8"
Apply adhesive to the inside of the first 0.5" section of one of the accordion pieces. Adhere one of the 6" x 4" pieces to it. Adhere the other accordion fold piece to the opposite side.
Fold the next mountain folds inwards and apply adhesive. Adhere another of the 6" x 4" pieces to either side. Repeat this until all of the dividers are adhered.
Wedge the edges of the 0.5" section on the 11-5/8" x 4.25" piece of card. Apply adhesive and adhere the 6-1/8" x 4.25" piece of card (album front) to it.
Apply adhesive to the back of the accordion and adhere to the 6-1/8" inside back section of the 11-5/8" x 4.25" piece of card.
Apply adhesive to the front of the accordion, fold up the front panel and adhere - ensuring the angles are square at the bottom.
Create a handle before sticking the top panel down. On the back of the top paper layer measure in approx 0.5" on each side and draw a line. Using a craft knife, make a 5/8" slit on each pencil mark.
Cut a piece of paper measuring 5/8" x 4.5", curve over your fingers and then fold up 0.25" on each end.
Slide the ends into the slits on the paper layer and secure at the back with glue. Adhere the paper layer to the top of the album.
Retrieve the image and adhere to the front of the album, below the top flap, using either glue or foam tape.
Cut out some embellishments from the papers and decorate as desired.
For more inspiration check out the Stamping Bella Sisterhood page over on Facebook, where you can add your own Stamping Bella creations.
My Social Media Sites


