Pages

Wednesday, 4 March 2020

Curvy Girl Doctor | Stamping Bella

Hi all, I'm popping in quickly to share another one of Stamping Bella's newest release stamps - Curvy Girl Doctor. She's also been cut out using the coordinating CUT-IT-OUT Die. 


The papers I used on this card are quite old. I got them from Scrapbook.com a long time ago. The creamy colour paper is by Karen Foster but there is no name on the navy heartbeat paper behind it. 

The pill  bottles are cut from a La-La Land Crafts die. I cut some from vellum to make clear bottles. The sentiment comes with the image stamp. 


Coloured with Copic Markers
Skin - E00, E11, E04
Hair - E50, E51, E53, E55
Outfit/bag - C1, C3, C5. R35, R37, white gel pen
Clipboard - E40, E41

My Social Media Sites
   

Tuesday, 3 March 2020

Curvy Girl Bachelorette | Gatefold Easel Card Tutorial

Hi everyone. Today I'm sharing a tutorial I had over on the Stamping Bella Blog a couple of weeks ago. I've made a couple more of these cards since and I just love how they turn out. Seriously, give them a try - they are just so much fun to make and they look really great on display. 

Curvy Girl Bachelorette Gatefold Easel Card


Supplies:
White card
Designer papers
Scoring board and bone folder
Paper trimmer
Adhesive
Foam tape/dots
Embellishments


How to:
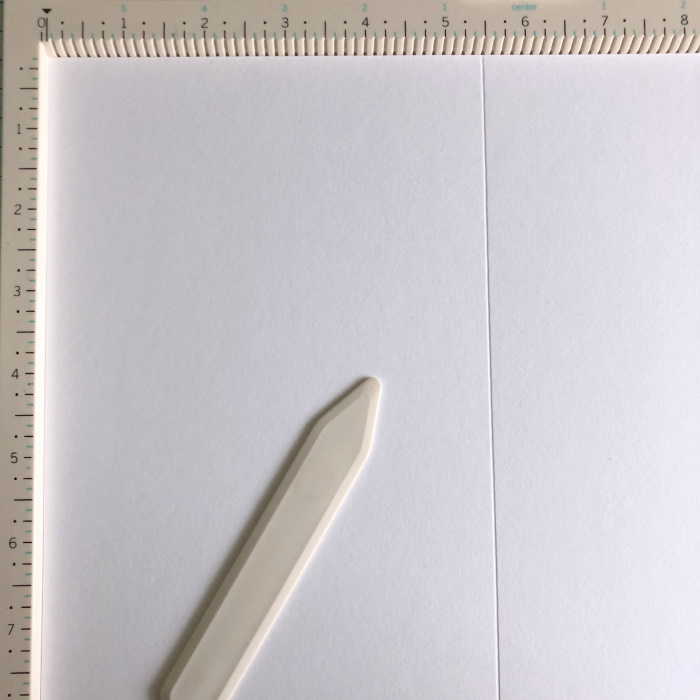
Start with a piece of card measuring 8.5" x 11". Score on the 11" side at 5.5"
Turn 90 degrees and score at 2 1/8" and 6 3/8" on the 8.5" side.


With the card base in the portrait position, cut away the two outer pieces on the top half only.


To ensure the top folds neatly inside the gatefold, trim a shaving off the outer edges of the centre piece - approx 1/16" from each side.


Score the top section at 2.75", as shown


Fold in both sides and crease with a bone folder


Fold the top section in half and crease with a bone folder.


Cut one piece of white card measuring 4 1/8" x 5.5". (If you cut more than 1/16" off each side, measure across the top section of the card and cut one piece of white to that width, and 5.5" long. The width will depend on how much of a shaving you trimmed off.)
Cut another piece of card measuring 4" x 5 3/8" and a piece of paper measuring 3 7/8" x 5.25" 


Adhere all three pieces together.


Apply glue to the bottom half of the easel and adhere the front panel.


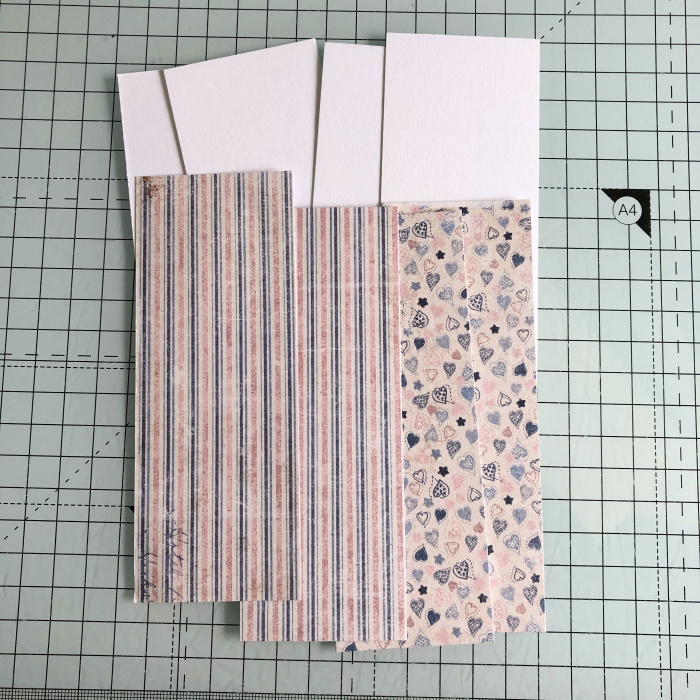
For the inside and outside of the gatefold side flaps, cut four pieces of white card measuring 2" x 5 3/8" and four pieces of paper measuring 1 7/8" x 5.25". Adhere a piece of a paper to each of the card pieces.


Adhere the panels to the inside and outside of the gatefold. Set the card base aside.


Stamp Curvy Girl Bachelorette onto a piece of white card and colour using your desired medium. 


Fussy cut the image, or use the coordinating CUT-IT-OUT die


Cut the middle size Celebrate Sentiment from white card. 


Stamp the sentiment onto white card and cut out using a rectangle die.


Adhere the sentiment on the inside bottom of the card base, just beneath where you want the front to stand. The front panel sits behind the sentiment, which holds it open.


Decorate the front of the easel as desired. Adhere the image using foam tape that isn't too thick, as the gatefold needs to close over it.


Cut a strip of card measuring 10" x 1.75". Centre it across the front of the card and then gently fold it around. This is the best way to ensure the belly band fits properly.


Apply double sided tape on the inside of one end, and the outside of the other end. Remove the tape liner and fold the belly band, securing the ends at the back.


Cut two pieces of paper measuring 4.25" x 1 3/8", and adhere to the front and back of the belly band.


Cut a white card scalloped circle measuring 2" in diameter, and a designer paper stitched circle measuring 1/75" in diameter. Adhere together.


Adhere the circle to the front of the belly band and then add the Celebrate cut out.


Slide the belly band onto the closed card.


To display the card slide the belly band off, open the gatefold, and pop up the easel.

Friday, 28 February 2020

Stamping Bella Bellariffic Friday

Happy Friday!! It's time for another Bellariffic Friday and this week our theme is

Newest Release Showcase 
💖💖💖

My card features not only the newest release, but the newest line of vintage stamps, Edgar and Molly. These characters are based on children's storybook characters and come in sets so they are great for mixing and matching.

The set I've used is Edgar and Molly Vintage Clock Collection.
This set also has coordinating Dies available.

I kept my card very clean and simple, and just added a rivet and twine for embellishment. I love the sentiment - it's one from the Edgar and Molly Vintage Sentiments set. I think it works really well with these images.


Coloured with Copic markers:
Molly:
Skin - E00, E11, E04
Hair - E51, E53, E55
Dress - R81, R83, White gel pen
Dog - C3, C5, C7
Clock - C5, C7, YR20, YR21, YR31
Ground - C1, C3, 0


Other Products Used:
Card  - Papermilldirect
Papers - My Mind's Eye
Mama Elephant Sweet Feline Die
Bronze Rivet
Jute twine

This month's Stamp and Die of the Month is Curvy Girl with a Jar of Hearts. Both the stamp and CUT-IT-OUT Die are 25% off for the month of February.

For more inspiration check out the Stamping Bella Sisterhood page over on Facebook, where you can add your own Stamping Bella creations.

My Social Media Sites
   

Thursday, 27 February 2020

Irish Chicks | Double Diamond Card

Hi! I'm back today with this Irish Chicks Double Diamond Card, I have a step by step on how to make it over on the Stamping Bella blog. Be sure to go check it out. 
Supplies needed are listed below. 


Supplies needed:
White card
Green papers
Circle and Scalloped Circle Dies
Pennant Die
Copic markers or other colouring medium. 

Have a great day!
xXx

My Social Media Sites