Pages

Thursday, 21 May 2020

Accordion Photo Box | Stamping Bella

Hi! Today I'm sharing a tutorial I made for Stamping Bella. I saw this cute idea for a photo box a while back and knew it would be perfect for the Uptown Girl Snapshot Minis 

The idea behind this project is to fill up the rest of the squares with your own photographs.

I also used the Snapshots Minis CUT-IT-OUT Die which is currently on sale for $2.99!!
Stamping Bella is retiring all Dies so once they are gone they are gone. 


Supplies:
Card
Patterned paper
Scoring board and bone folder
Adhesive
White Ribbon
Tag Die

How to:
For the box:
Cut one piece of card measuring 6-1/8" x 10-1/8" for the bottom of the box, and another piece measuring 6-3/16" x 10-3/16" for the top of the box. Score both pieces at 1" on all four sides.


On both pieces, cut away the 3 outer squares in each corner. Cut and taper the last square as shown. Taper the edges of all the outside sections.


Apply double sided tape the inside of the four outer sections.


Apply double sided tape the outside of the four 1" tabs.
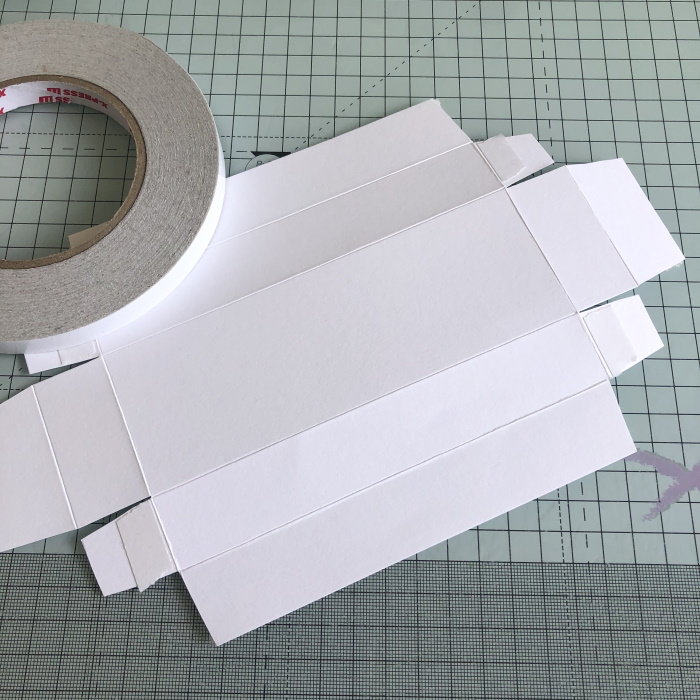

Remove all the tape backing and fold up the boxes. Set aside for now.


For the accordion:
Cut a piece of card measuring 6" x 12" and score at 2", 4", 6", 8" and 10"


Mountain/valley fold so that you have two peaks in the middle.


Cut twelve pieces of white card measuring 1-7/8" x 1-7/8" and twelve pieces of patterned paper measuring 1.75" x 1.75". Use double sided paper to alternate the design.


Cut two more pieces of patterned paper measuring 5-7/8" x 1-7/8" and adhere them to each end of the accordion. Adhere the squares of white card along the four inner sections.


Stamp the Snap Shots Minis on to white card and cut around them out using a scissors.


 Colour using your desired medium


Using the Snap Shots Mini CUT-IT-OUT Die, cut four Polaroids


Adhere the Polaroids to the images. Adhere the patterned paper squares on to the card squares and then place the images as desired. Use the other squares for your own personal photographs.


Apply adhesive to the back of each end, adhere one end to the inside of the top of the box, and the other end to the inside of the bottom of the box.


Close up the box. 
Cut a piece of patterned paper for the top, measuring 6" x 2". Cut two pieces for the long sides at 7/8" x 5-7/8" and two more pieces for the short sides at 7/8" x 2". Glue all the pieces to the box top.


Stamp the sentiment from Uptown Girl Snapshots "I Heart You" and cut out using a tag die. Thread some white ribbon through the hole at the top and decorate the tag as desired.


Using foam tape/dots, adhere the tag the front of the box.


For more inspiration check out the Stamping Bella Sisterhood page over on Facebook, where you can add your own Stamping Bella creations.

My Social Media Sites
   

Tuesday, 19 May 2020

You are Wheely Wonderful | Create A Smile

Hi! Today I'm sharing a card I made for the current Create a Smile mood board challenge.

First though - I haven't been very active on social media for most of April and May and some of my good friends have been messaging to check in on me, so I am throwing in a quick update at the bottom of this post, if you care to read it :)  

So, this is my card. I used some of the stamps I bought from the last Create a Smile release and hadn't gotten around to using - this is why I love challenges! This stamp set is called Ting-a-ling and includes six different options for the basket filler and four sentiments. I used the colours from the mood board as inspiration for my card. 


Copic Markers used:
BG45, BG53, BG57, BG09
R01, R22
RV55, RV63, RV66
E50, E51, E53
C3, C5, C7

For the background I used a clouds stencil and Tumbled Glass distress oxide ink. 


Other products used:
Card - Papermilldirect
Papers - Clearly Besotted Stamps
Clouds Stencil - La-La Land Crafts

***********************************************

April is always a crazy month for me. For the past four years I've had April college exams so I get very little time to make cards and to be active on my blog or on Instagram. I finish my exams around the third week of April and then spend a few days just resting my brain. I would usually Insta most of my cards, but I'm not so good when it comes to blogger, lol.

Anyway, the Covid-19 restrictions have been hard on me, and I know I'm not alone in this. I am your typical introvert so keeping my own company has never been an issue. As an introvert though, I need time away from people - to recharge, to be in my own head, and that just hasn't happened - and it won't happen for the foreseeable future. The last time my daughter was in school was February 28th, and then the schools/colleges closed for everyone on March 13th. My husband is also working from home. When one of us goes out walking, we all go.

I have been colouring, A LOT, and I have been making lots of cards but it's hard to be 'social' when your head is in turmoil and you constantly feel stressed. Even though restrictions have been relaxed a little, the risk of catching Covid-19 is still there so we're still not going out for now.

We will all get through this, history has shown us that, but whether we'll come out of it a different people is the question. We've lived nearly three months with no coffee shops, no hair/nail appointments, no takeouts, and no shopping trips just for the sake of going shopping, BUT, we're also exercising more, eating better (for the most part) and spending time with our immediate family. I can't claim to be spending less, because my teenagers are determined to eat me out of house and home.

So, yes, I'm fine. I'm struggling, but I know you can all relate and we're all going through this together. Thanks to those who checked in on me, you're awesome and I'm lucky to have such good friends.

My Social Media Sites
   

Friday, 15 May 2020

Bellariffic Friday | Stamping Bella

Happy Friday!! It's actually just come as a complete shock to me that today is Friday. Who else has no clue what day of the week it is anymore? 😷😷😷

Today I am sharing my Stamping Bella Bellariffic Friday card but before I get to my card, just a quick reminder that all Stamping Bella dies are being retired and they are selling out fast. However there is still a limited selection of dies available here,  so if you've been thinking about grabbing some, now is the time!

Our theme this week is
 Stamp of the Month Collection. 

This month's Stamp of the Month is Bubble Chicks and you can grab it at 25% off for the month of May, while stocks last. The whole design team is showcasing the Cool Chicks for this week's Bellariffic Friday and my card features one of my favourites, The Chicks who Couldn't Even.


I made clean and simple tag cards using just white card and a brick embossing folder. I used all three of the chicks. The chick on the middle tag is leaning up against a wall so I cut around the chick to remove the wall so that I could use him the same way as the other two.

Coloured with copic markers:
Y11, Y13, Y15, Y17, YR23
YR15, YR18


Other Products Used:
Card  - Papermilldirect
Stitched Tag Dies
Enamel Dots

For more inspiration check out the Stamping Bella Sisterhood page over on Facebook, where you can add your own Stamping Bella creations.

My Social Media Sites
   

Friday, 8 May 2020

Forward is Forward | Stamping Bella Bellariffic Friday

Happy Friday!! Today I am sharing my Stamping Bella Bellariffic Friday card.
Our theme this week is

 Vintage
(any stamp NOT from the newest release)

My card features Oddball Turtle and coordinating die.
All Stamping Bella dies are being retired, and unfortunately the die for this stamp is now sold out. However there is still a limited selection of dies available here,  so if you've been thinking about grabbing some, now is the time!


Coloured with Copic markers:
YG21, YG23, YG25, YG17, BV0000
YG91, YG93, YG95


Other Products Used:
Card  - Papermilldirect
Papers - Echo Park
Stitched Rectangle Dies (frames)
Distress Oxide ink - Mowed Lawn

This month's Stamp of the Month is Bubble Chicks and you can grab it at 25% off for the month of May, while stocks last.

For more inspiration check out the Stamping Bella Sisterhood page over on Facebook, where you can add your own Stamping Bella creations.

My Social Media Sites
   

Thursday, 7 May 2020

Love Story Squidgies | Pop Out Wedding Card

Hi everyone! Today I'm sharing my Stamping Bella Tutorial Thursday project - a pop out wedding card featuring the Love Story Squidgies. 

In case you missed it, Stamping Bella is having a clearance sale and there are loads of stamps and dies heavily discounted. Everything is selling out fast, so be quick if you want to nab stamps and dies at a fantastic price. Sadly, Dies are being discontinued so when they're gone, they're GONE! 

The coordinating CUT-IT-OUT Dies for Love Story Squidgies are still available and are only $4.99 so if you've been thinking of getting them, now is the time to do so. These Squidgies come in 2 sizes, both included in one stamp set so the dies are also a set of two. 


Supplies:
Card
Patterned papers
Scoring board and bone folder
Adhesive
Foam tape/dots
Embellishments of choice

How to:
For the card base cut one piece of white card measuring 5.5" x 5.5" and score at 2.75".


For the layers, cut a piece of card measuring 2" x 6.5" and another piece measuring 5" x 3.5" 
Score both pieces at 0.5" on both ends.


Cut a piece of paper measuring 5 3/8" x 5 3/8" and fold in half.


Adhere the paper to the card base and bend both sides upwards into a 'v'


Take the 5" x 3.5" piece of card and create a curve by rolling it over your fingers. Fold the 0.5" end sections back at the scorelines.


Cut a thin wedge from each end of the 0.5" sections.


Flatten the card base and adhere the smaller panel in the centre, approx 1/4" up from the bottom.


Cut a piece of paper measuring 3 3/8" x 3 7/8" and adhere to the smaller panel.


For the front strip, curl the 2" x 6.5" over your fingers and fold back the 0.5" end sections.


Adhere a piece of paper measuring 1 7/8" x 5 3/8" to the front


Apply double sided tape to the inside of the 0.5" sections.


Taper the edges of each end.


Adhere one end of the strip behind the card base, lining it up with the bottom


Bring the strip across the front and adhere the other end behind the card base. 
Set the card aside to work on the image.


Stamp the Love Story Squidgies onto white card and colour using your desired medium. 


Cut out using the coordinating CUT-IT-OUT Dies or fussy cut with a precision scissors.


Stamp the sentiment onto white card and cut out using a tag die. 
Cut a selection of die cuts for embellishments.


Apply foam tape to the back of the Squidgies and adhere them to the middle panel, just above the front strip.


Adhere the tag across the front strip, and use the die cut embellishments to decorate as desired.


For more inspiration check out the Stamping Bella Sisterhood page over on Facebook, where you can add your own Stamping Bella creations.

My Social Media Sites